Setup
Get permissions
Before setting up, ask for permission from nexus-e@ethz.ch to access the codes and the input database.
Note
⚠️ Currently, the codes and databases are only accessible with an ETH account.
Local setup
Even though the current Nexus-e platform is not yet suitable to run locally because of high consumption of resources such as memory, we do recommend to at least get the codes and connect to the database locally in order to view, understand, and edit them easily.
Most the instructions below have been tested both on Windows and on Mac.
1. Get the codes
Make sure you have installed git.
The instructions here use command lines. If you have a GUI tool for git, you could use the corresponding operations in the GUI tool instead. An example using a GUI tool “GitKraken” can be found in section Nexus-e repository instructions.
Create a folder where you want to put the codes
cd to that folder
Clone the overarching repository with this command:
git clone --recursive https://gitlab.ethz.ch/nexus-e/nexus-e-framework.gitYou will be asked for your username and password for the repository and its submodules.
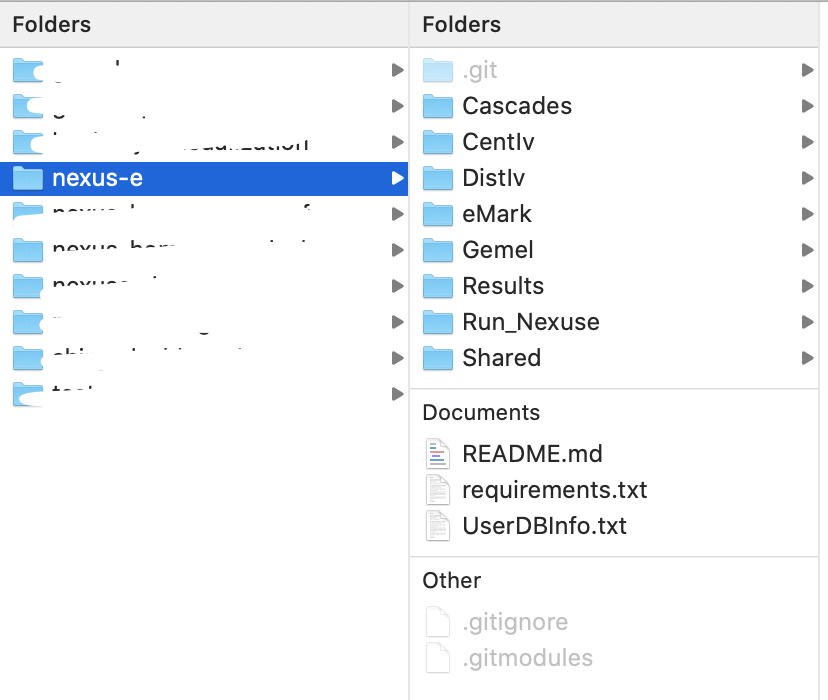
In the end, the folder will look like the screenshot below. Note: You might not see the hidden files whose names start with a dot, and the Results folder will be automatically generated when you run Nexus-e.
2. Connect with the input database
Find information to connect with the database in
UserDBInfo.txtin the repository. The file contains four lines (for confidentiality the username and password is not written here, but can be found in the file):
itet-psl-s04
3306
DATABASE_USERNAME
DATABASE_PASSWORD
View the database
Install MySQL (Version 8.0 is recommended) and MySQL Workbench. For Windows, follwing this instruction. For MacOS, follow this instruction.
Connect to ETH VPN
Connect to the database with MySQL Workbench
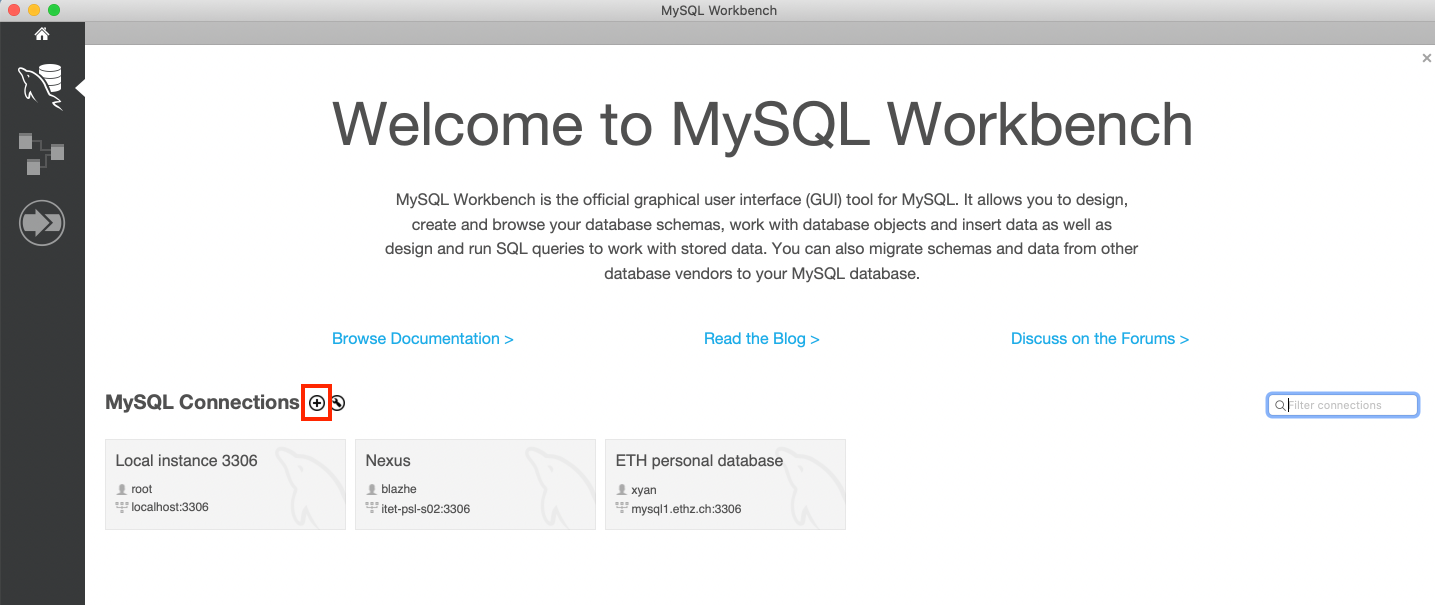
Add a new MySQL connection
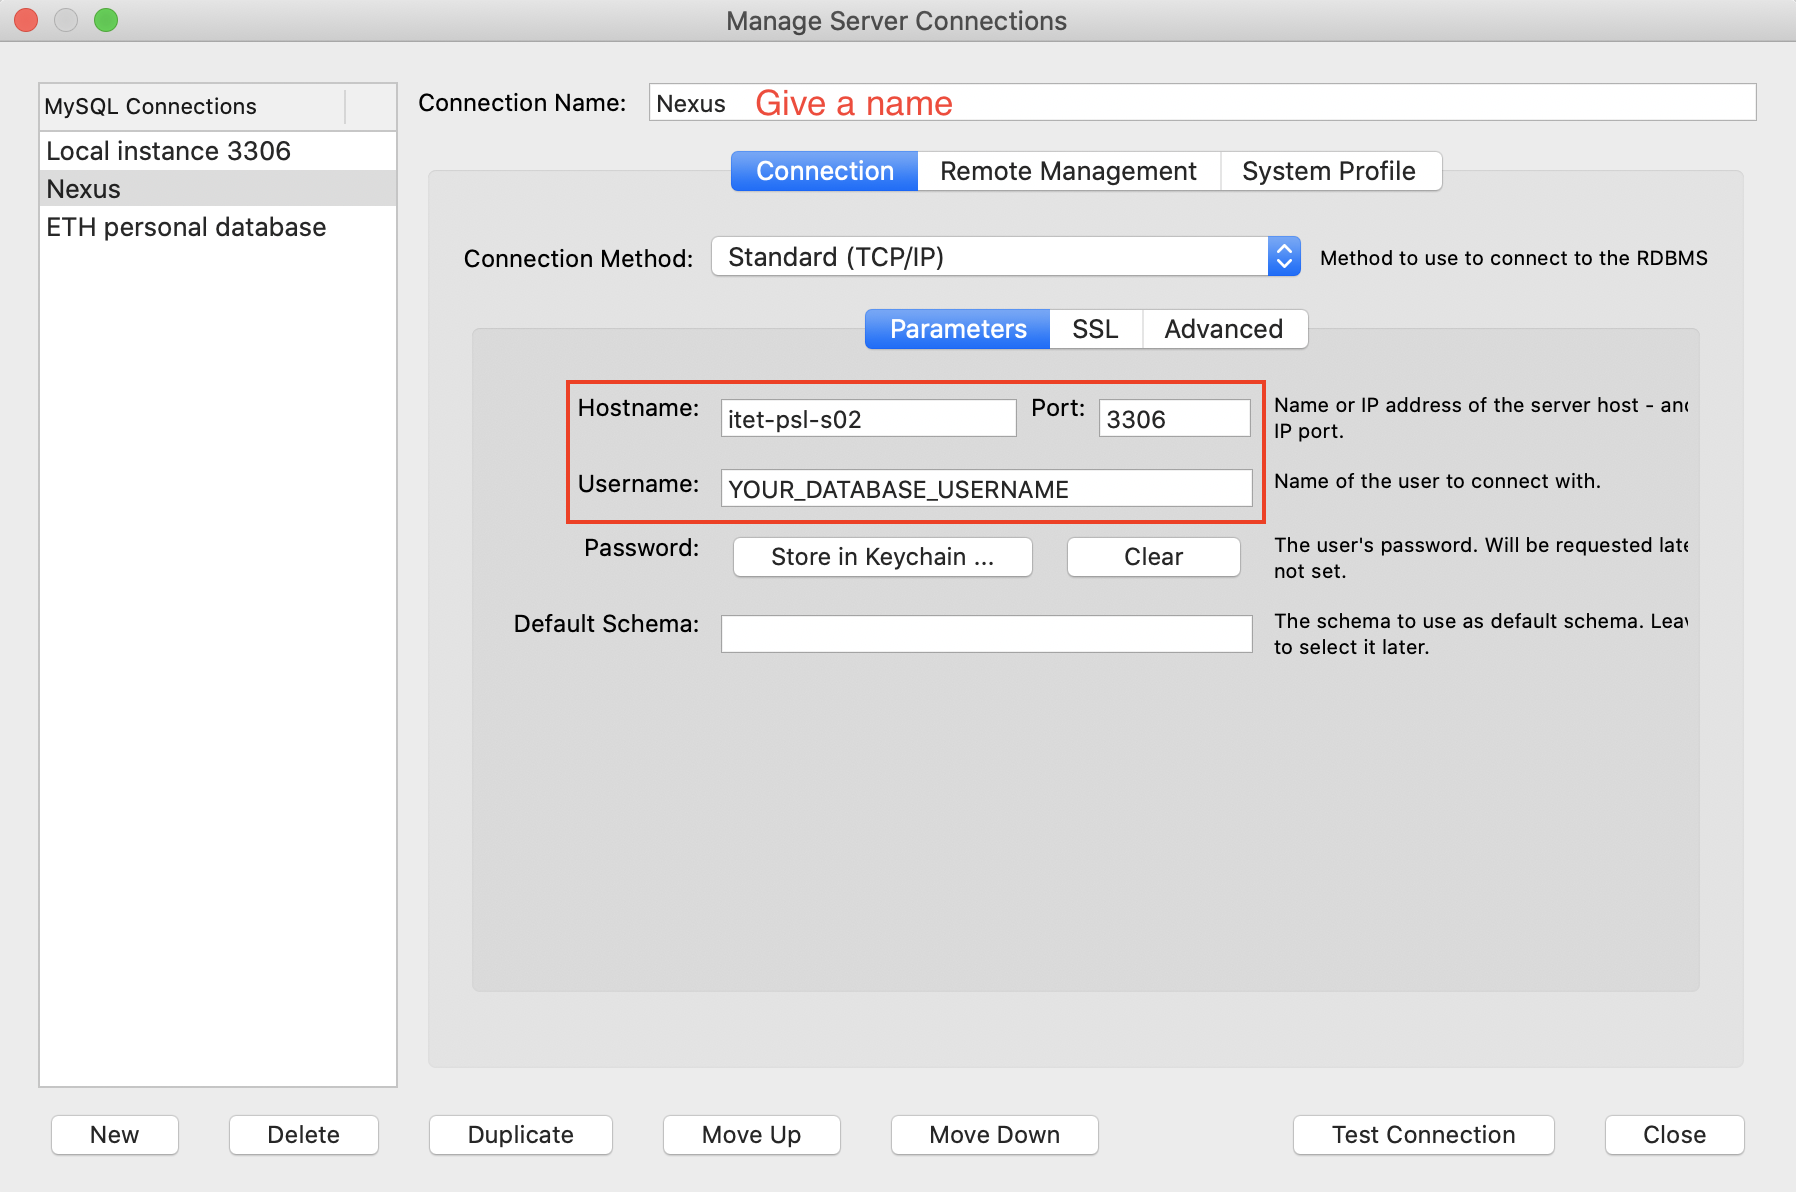
Input connection information
Click the button
Test Connection. You will be asked to input your database password. Then you will see a seccess message: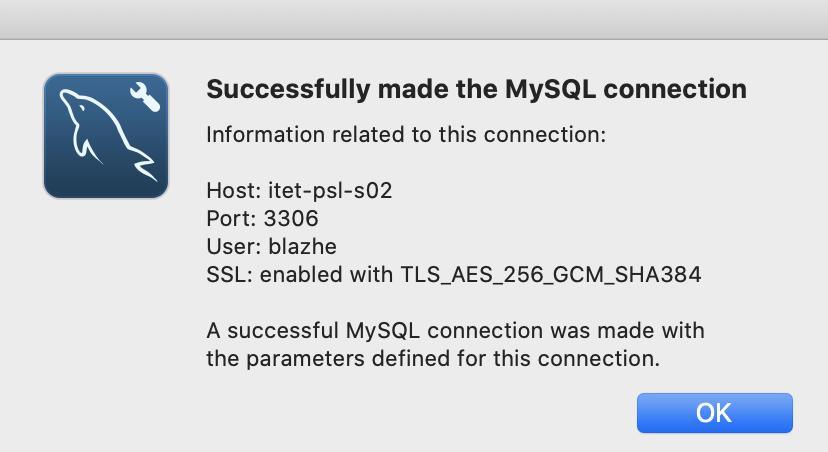
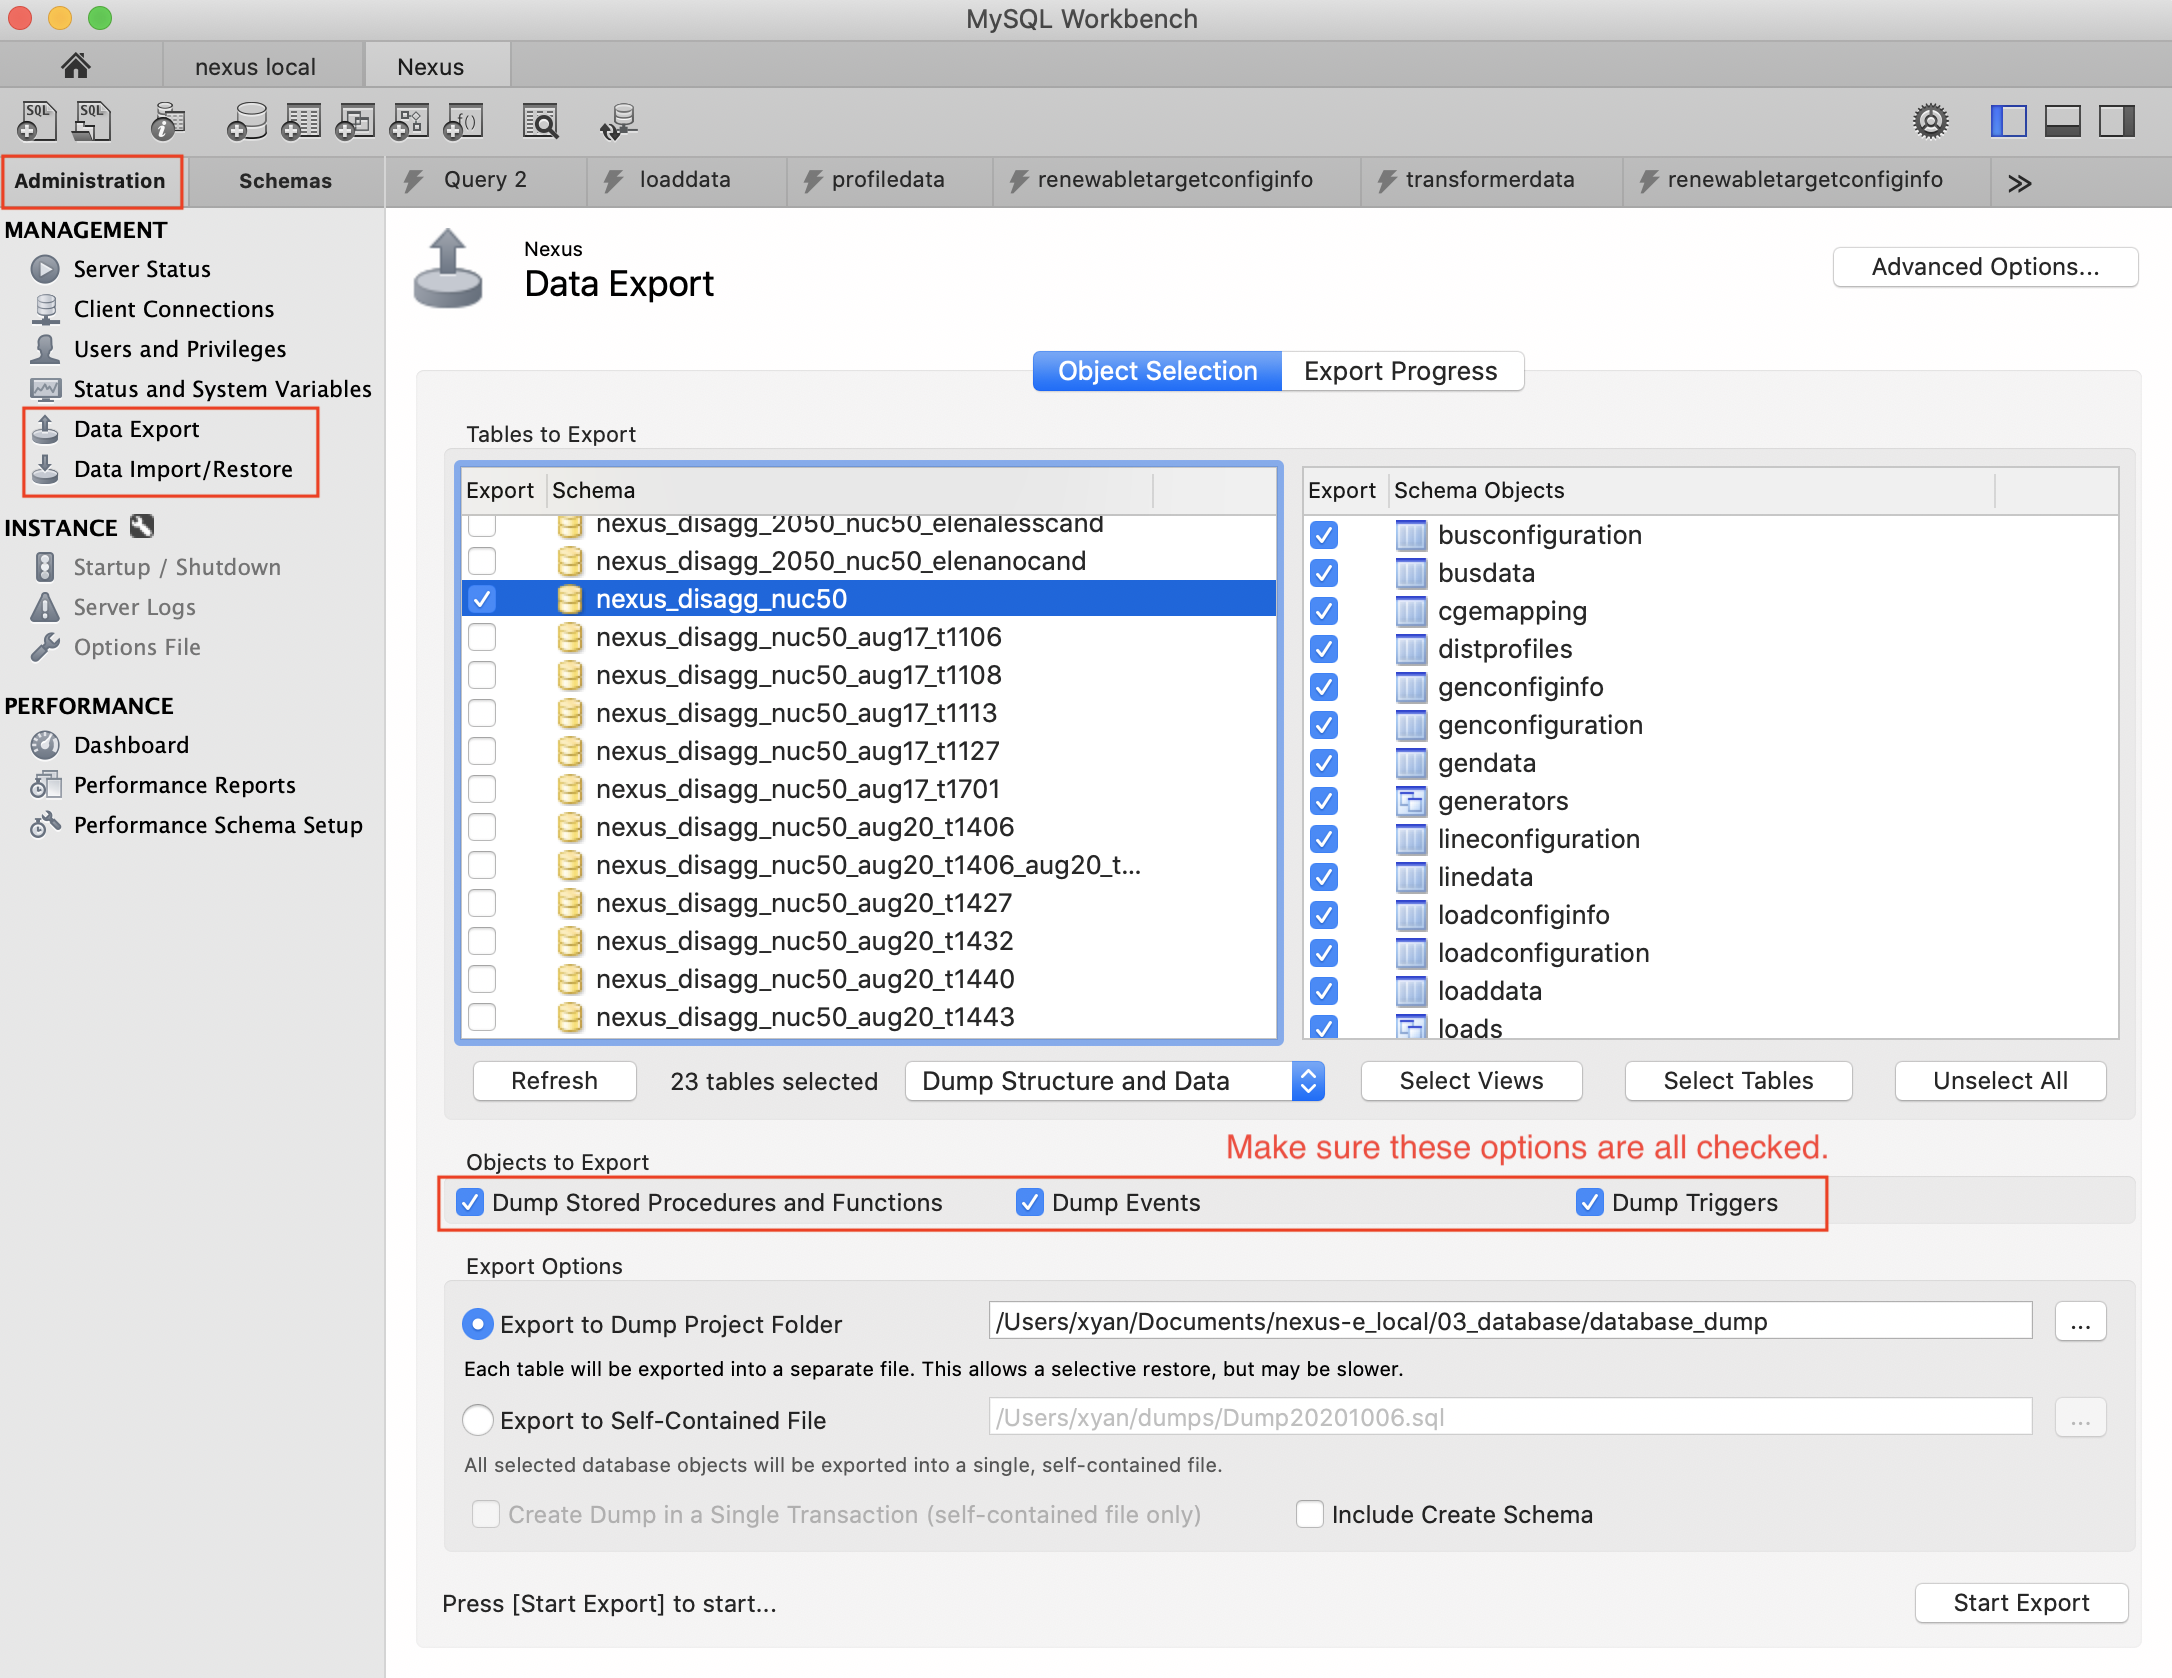
2.1. (Optional) Make a local copy of the database
⚠️ By default, everyone has write permission to the database. Therefore, to be safe, always make a local copy of the database before playing with it - i.e., first “Dump” it to a local folder, then import it to your personal MySQL account. These can be done in this window:
You might encounter the following problems when you run Nexus-e with a local database, follow the link for possible solutions:
(1) Error: “Access denied for user ‘your_username’@’your_host_address’ …”
(2) Error: “The server time zone value ‘xxx’ is unrecognized …”
(3) Error: “The user specified as a definer (’xxx’@’%’) does not exist …”
3. Prepare software & license
Apart from MySQL introduced above, we also need the following software to run Nexus-e locally. This will be introduced in this section. You could skip this section if you don’t plan to run the whole Nexus-e platform locally.
Matlab
Python
Gurobi
GAMS
Latex
ImageMagick
Matlab
Download Matlab (R2020a or higher). Available at ETH IT shop.
During installation, you need to install the “Database Toolbox”, the “Financial Toolbox”, and the “Communication Toolbox” as well by ticking the box for each toolbox (This option is available if you downloaded Matlab through the ETH IT shop). If this is not an option during installation, you can download it seperately here. If possible install all toolboxes to avoid any inconveniences.
Set up database connector
Download the MySQL connector from here. Unzip the file. Before downloading, select “Platform Independent” from the “Select Operating System” drop-down list.
Copy the MySQL connector folder (e.g. mysql-connector-java-8.0.18) into a folder at your preference. We recommend to put it into the Matlab preferences folder, which you can find by typing in Matlab Command Window
prefdir.Create a javaclasspath.txt file in the Matlab preferences folder.
In the javaclasspath.txt file, write the path to the connector .jar file that you just copied. E.g., On a Windows computer the path is similar to
C:\Users\user\AppData\Roaming\MathWorks\MATLAB\R2018a\mysql-connector-java-8.0.18\mysql-connector-java-8.0.18.jar.Reload Matlab
Test whether a database connector is set up successfully. Write the following commands in Matlab (substitue
YOUR_USERNAMEandYOUR_PASSWORDwith your credentials for the database). If the second command returns1, it means success.
conn = database("sys", YOUR_USERNAME, YOUR_PASSWORD, 'Vendor', 'MySQL', 'Server', 'itet-psl-s04');
isopen(conn)
Python
Download Python. Version 3.8.6 is recomended. Python 3.9 is not compatible with Gurobi 9.0.x yet.
(Optional) If you (will) use Python for multiple projects, it is recommended to create a virtual environment for Nexus-e (for example, using virtualenv).
Install the required python packages listed in
requirements.txt(e.g., with commandpip install -r requirements.txt).
Gurobi
Download Gurobi (9.0 is recomended) and set up a free Gurobi academic license from here.
Connect Gurobi with Python following this instruction.
Save Gurobi path for Matlab
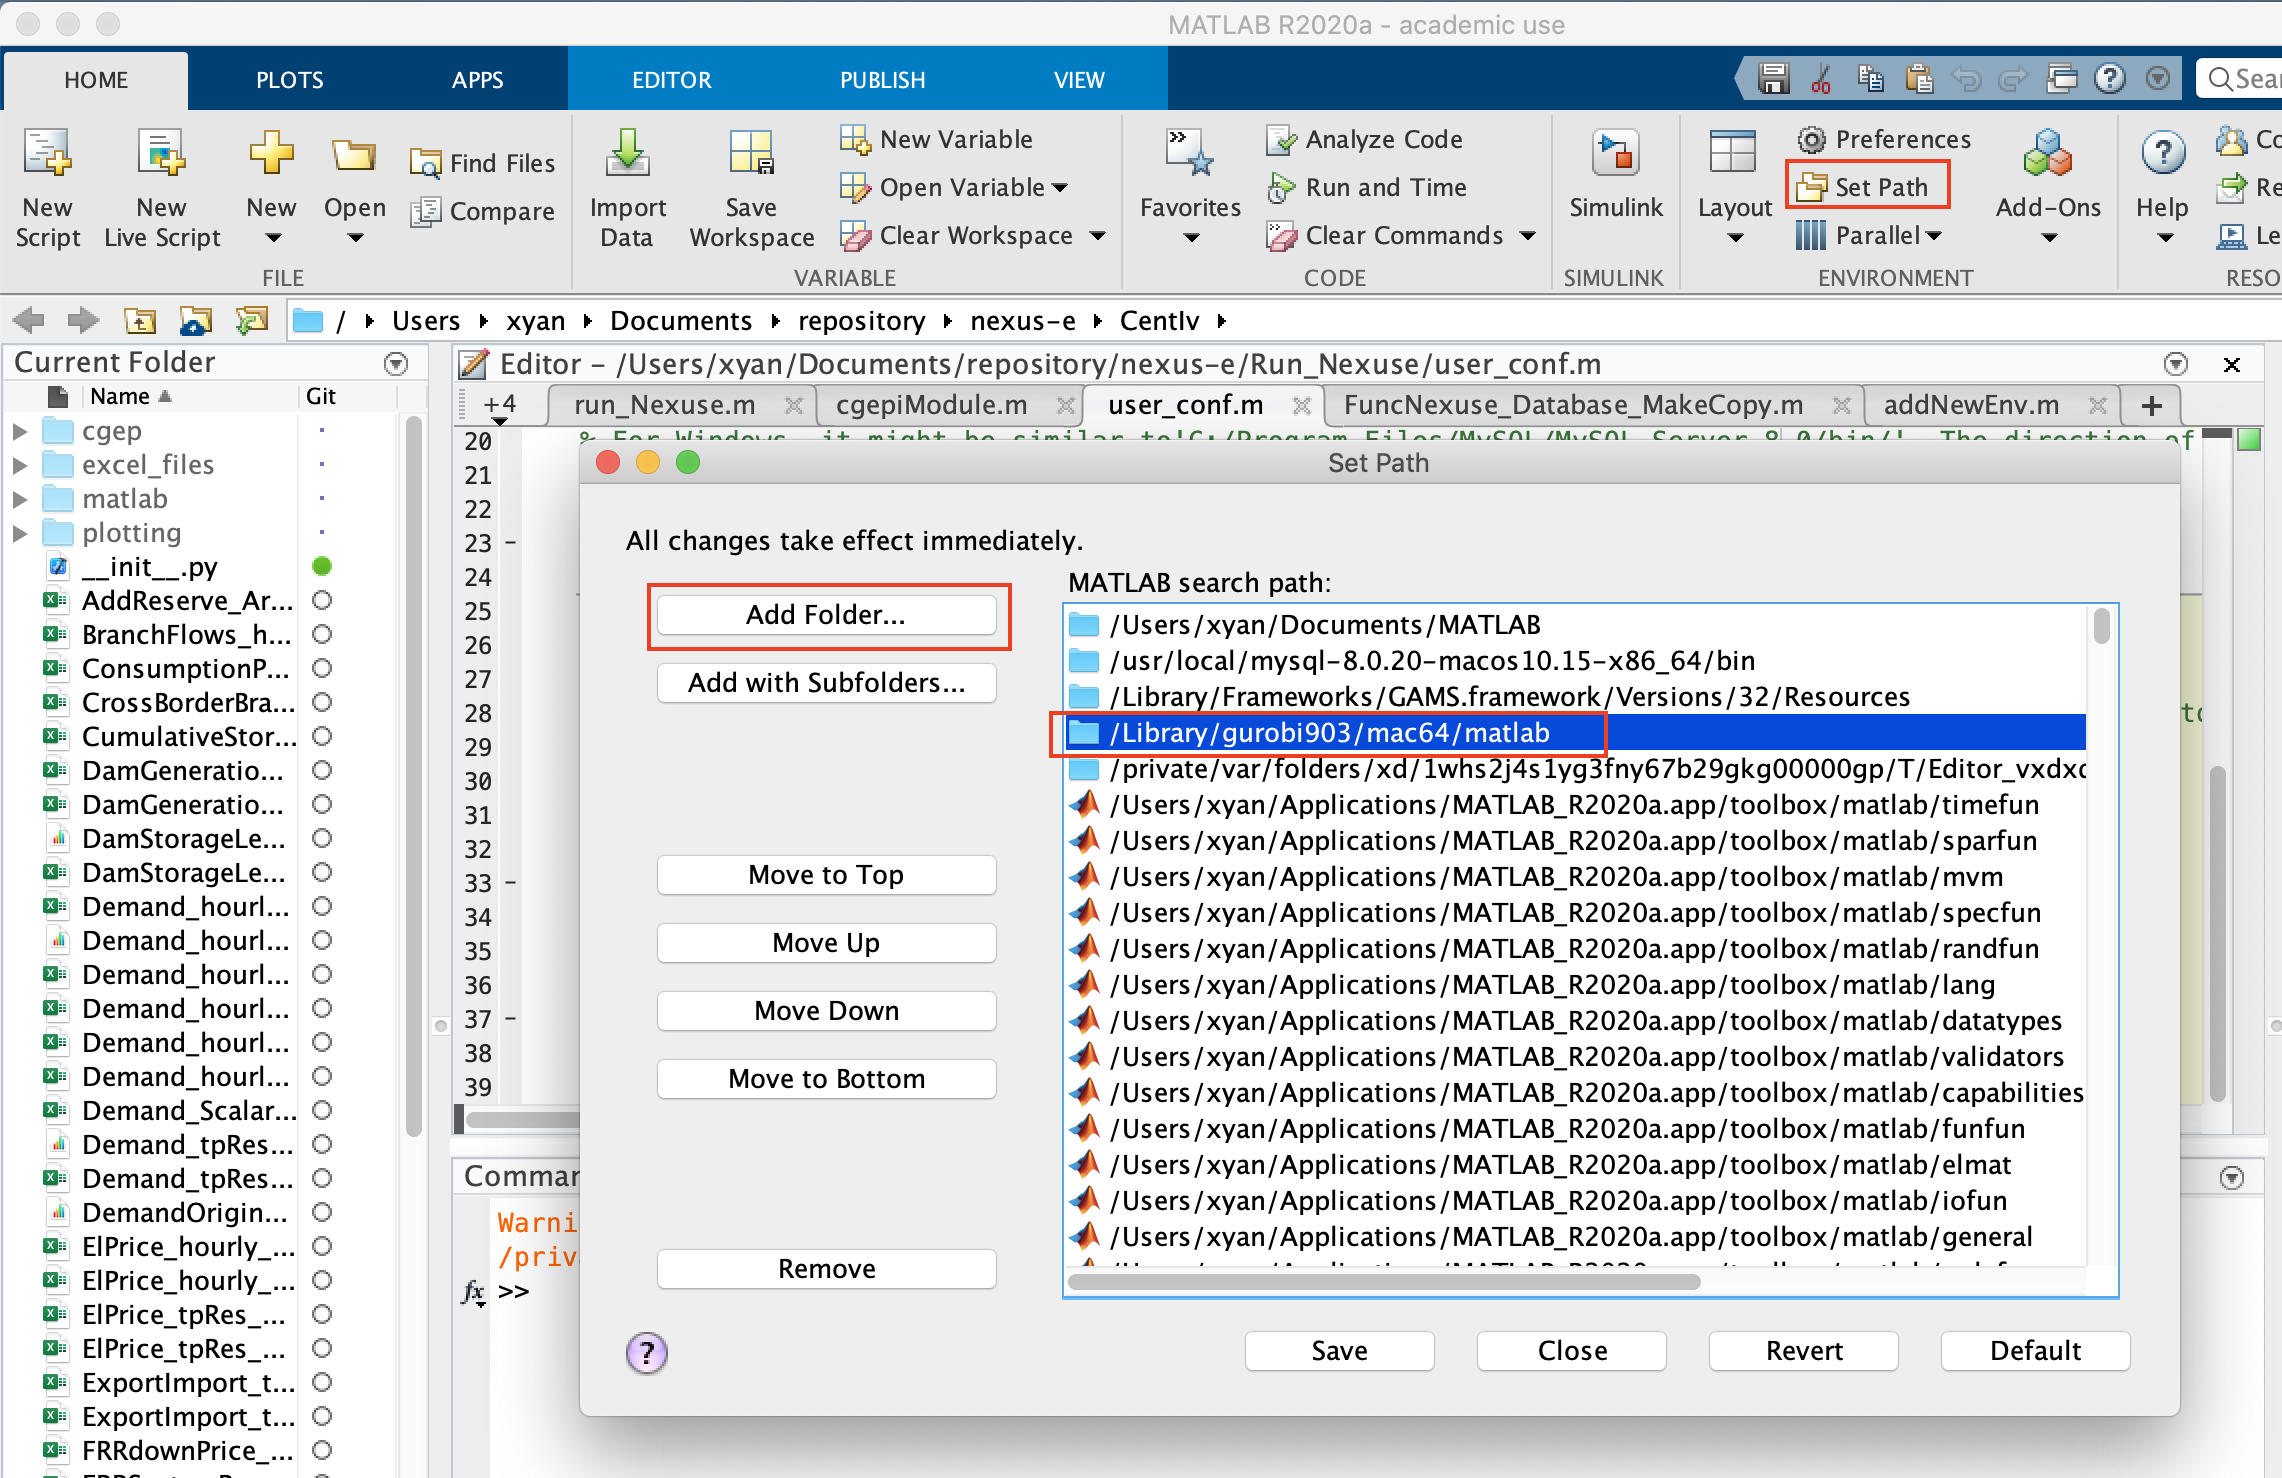
Find out the path of
gurobi_setup.m. (E.g., for mac, it is similar to/Library/gurobi903/mac64/matlab.)Open Matlab; under the tab “Home”, click Set Path; select Add Folder…; browse to the folder containing
gurobi_setup.m; click Open.A new entry of the selected path will appear on the right side of the Set Path window; click Save.
GAMS
Download GAMS. Version 32.2 is recomended. Our current license doesn’t support versions newer than 32.
Set GAMS License
Save GAMS path for Matlab
Find out your GAMS path. It varies largely depending on your PC’s operating system and the version of GAMS. For example, GAMS 32 on Mac has the path:
/Library/Frameworks/GAMS.framework/Versions/32/Resources.Similar to how you configured Gurobi for Matlab: Open Matlab; under the tab “Home”, click Set Path; select Add Folder…; browse to the GAMS path; click Open.
A new entry of the selected path will appear on the right side of the Set Path window; click Save.
Connect GAMS with Python
Follow the instruction here.
Latex
Download Latex.
ImageMagick
Instructions for Windows:
Download ImageMagick from here. Install ImageMagick from the .exe file. Tick all boxes when asked which packages to be installed (by default only the first three are selected).
Download dependable software “Ghostscript” from here. Select Public License Ghostscript. Install the Ghostscript.
Optional (if ImageMagick does not work), download and install Visual studio from here.
Instructions for Mac:
Install ImageMagick from here
Test if ImageMagick works:
Open Windows command prompt and browse to folder that contains a pdf file, e.g., testch.pdf
Use the following command to convert file:
convert testch.pdf testch.jpg
4. Edit conf_local.m
Make a copy of
example_conf_local.min the folderRun_Nexuse/conf_local. Name the copy asconf_local.m. (Note: You should only work with the local copy, because the originalexample_conf_local.mwill be synchronized to git and it shouldn’t be changed.)In
conf_local.muncomment and modify the following variables based on your local computer’s settings. More instructions can be found in the scriptconf_local.mitself.PATH_MYSQL
PATH_PYTHON
PATH_GUROBI_FOR_PYTHON
PATH_LATEX
PATH_CONVERT
PATH_GAMS
Note
You don’t necessarily need all software paths here. For example, if you only want to run the postprocess scripts,
PATH_GUROBI_FOR_PYTHONis not needed; if you only want to run DBcreation scripts, onlyDB_INFO_FILEandPATH_MYSQLare needed.(Optional) If you want to work with a local copy of the database
Make a copy of
example_UserDBInfo_local.txtin the folderRun_Nexuse/conf_local. Name the copy asUserDBInfo_local.txt. (Note: You should only work with the local copy, because the originalexample_UserDBInfo_local.txtwill be synchronized to git and it shouldn’t be changed.)Edit
example_UserDBInfo_local.txtbased on your local settings:
127.0.0.1 (or "localhost")
3306
YOUR_LOCAL_USERNAME (e.g. "root")
YOUR_LOCAL_PASSWORD
Uncomment the variable
DB_INFO_FILEinconf_local.m.
Test
conf_local.m: in Matlab, run the scriptconf_local/conf_test.m.If your
conf_local.mis set up correctly, you should see outputs like “xxx works.”If you see “xxx FAILED”, there will be information in the output showing why xxx failed. However, this is not necessarily a problem. Because as mentioned above, you don’t always need all software. For example, if you only want to run postprocess scripts,
PATH_GUROBI_FOR_PYTHONis not needed; if you only want to run DBcreation scripts, onlyDB_INFO_FILEandPATH_MYSQLare needed.
5. Run Nexus-e
Connect to ETH VPN (in order to connect with the database)
Open Matlab
(Optional) Run
bench_Nexuse.m. This is required before you runrun_Nexuse.mfor the first time, or after major changes have been made to eMark and/or CentIv. Runningbench_Nexuse.mwill create a file/Gemel/results/benchmark_2015.matwhich is necessary to runrun_Nexuse.m.Run the script
run_Nexuse.min theRun_Nexusefolder. There are a few parameters that you can customize in the beginning of this run script:You could change the variables
scen,scenShortName,tpRes,limDifference, anddbSuffixas instructed in the scriptIf you don’t want to run all 4 years, adjust
endYfor the case you are running. E.g., if endY=staY, it will only run one year.
Consult the Nexus-e team if you want to run other scripts in the
Run_Nexusefolder.
Software for interacting with Euler from local machine
In our experience, it is usefull to have two tools available for
transferring files between Euler and your local machine and
interacting with the command prompt on Euler.
GUIs for file transfer
For transferring files between Euler and your personal computer, a graphical user interface (GUI) is useful. We suggest FileZilla since it is available for “all” platforms. The scicomp wiki also has information on this.
Command prompts for secure shell connections
Unix systems (Linux/Mac) come with shells (command prompts) from which useful interactions with Euler are possible.
E.g., type ssh <username>@euler.ethz.ch to make a “secure shell” connection to Euler and issue commands to the Euler command prompt.
Windows users are less fortunate and have to install additional software to achieve this functionality.
Examples are
putty.exe and
We can highly recommend MobaXTerm.
Login
Log-in with
sshon Unix-based operating systems:ssh <ethz-username>@euler.ethz.chLacking SSH keys, ssh will ask you for your ETH (LDAP) password and after that your following commands are issued to Euler. See scicomp wiki for instructions for setting up SSH keys if desired.
File transfers between local and Euler in FileZilla can be made through
sftp(secure file transfer protocol). For this, entersftp://euler.ethz.chin the ‘server’ field and your ETH-user name and password in the respective fields, then hit ‘connect’.Access to Euler: since May 2020, first time access to Euler is only granted upon request. ETH account holders just write an email to cluster-support@id.ethz.ch; If you used the Euler cluster before the 15. May 2020, then you would need to change your LDAP password to get again access to the Euler cluster (wait for 1 day until the change takes effect). (see https://scicomp.ethz.ch/wiki/Getting_started_with_clusters for more info).
Euler setup
In order to run the full Nexus-e platform efficiently, we use Euler, an ETH cluster for High Performance Computing. To set up the Nexus-e platform on Euler, you first need to access Euler. Instructions on accessing Euler and commands for Euler can be found here.
1. Join the Nexus-e user group
We have a user group for access to Nexus-e specific licenses (e.g. GAMS) and the Euler pre-paid share. The user group is called: MAVT-esc-nexus-e, and is set and maintained by D-MAVT IT. To join the user group, ask Blazhe Gjorgiev gblazhe@ethz.ch to send an email to servicedesk@mavt.ethz.ch.
To check whether you are added to the user group, use command line ssh to Euler (type ssh username@euler.ethz.ch), then type groups to show a list of groups that your user account is linked to, which should contain “MAVT-esc-nexus-e”.
2. Get the codes
Create a folder where you want to put the codes
cd to that folder
Clone the overarching repository with this command:
git clone --recursive https://gitlab.ethz.ch/nexus-e/nexus-e-framework.gitYou will be asked for your username and password for the repository and its submodules.
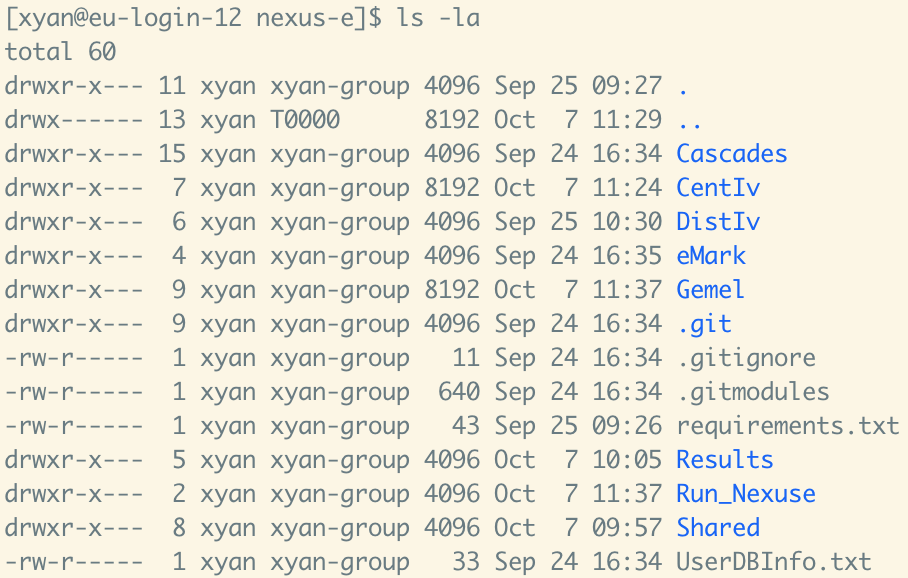
In the end, the folder will look like the screenshot below. Note: tThe Results folder will be automatically generated when you run Nexus-e.
3. Prepare dependencies
Unlike setting up Nexue-s locally, we don’t need to download any software or license on Euler. Instead, they are all prepared for all users in the user group MAVT-esc-nexus-e. You should already be a member of the group if you have followed the first step.
But still, we need to explicitely load all the dependencies, including modules (an Euler term for “software”) and python packages.
Load modules
Option 1: Manually load modules every time before running Nexus-e
Copy the following commands into Euler:
module load stack/2024-06
module load python/3.11.6
module load gurobi/10.0.3
module load matlab/R2023b
module load mysql/5.6.44-xnnqxau
Option 2: Edit
.bashhrcso that the modules are automatically loaded upon log in to Euler
Write the same commands at the end of
.bashrc. This is a hidden file in your Euler’s home directory.Test: To test whether the modules have been successfully loaded, type
module listin the commaand line. It should then list all loaded modules.Install python packages
This you only need to do it once, i.e. you don’t need to do it everytime when you run Nexus-e.
In command line under your home directory,
cdto the folder where you have stored the Nexus-e codestype
python -m pip install --user -r requirements.txt
You might encounter software compatibility problems when running Nexus-e on Euler, follow the link for possible solutions: Matlab & Python compatibility error: “ImportError: …pyexpat…: undefined symbol: XML_SetHashSalt”
4. Connect with the input database
Download the MySQL connector from here. Unzip the file. Before downloading, select “Platform Independent” from the “Select Operating System” drop-down list.
Copy the MySQL connector folder into the hidden .matlab folder (e.g., .matlab/2020a).
Tip: To see all folders including the hidden ones, use the command
ls -a.If you don’t see the .matlab folder, run Matlab once: type in
matlab-> you will see Matlab is started in the terminal -> type inexit-> Matlab will stop -> you should then see the .matlab folder.
Create a javaclasspath.txt file in the same folder as above.
In the javaclasspath.txt file, write the path to the connector .jar file that you just copied. E.g., On Blazhe’s Euler account the path is
/cluster/home/gblazhe/.matlab/R2018a/mysql-connector-java-8.0.18/mysql-connector-java-8.0.18.jar.Logoff and re-login to Euler
5. Run Nexus-e
cdto theRun_Nexusefolder(Optional) Run
bench_Nexuse.m. This is required before you runrun_Nexuse.mfor the first time, or after major changes have been made to eMark and/or CentIv. Runningbench_Nexuse.mwill create a file/Gemel/results/benchmark_2015.matwhich is necessary to runrun_Nexuse.m.Customize the run script
run_Nexuse.m.You could change the variables
scen,scenShortName,tpRes,limDifference, anddbSuffixas instructed in the script. (Recommendation: For quick test, usetpRes = 8andlimDifference = 0.1.)If you don’t want to run all 4 years, adjust
endYfor the case you are running. E.g., if endY=staY, it will only run one year.
Submit the job (the standard run script is
run_Nexuse.m) with a command such as (Note: Don’t type.mafter the script name.)
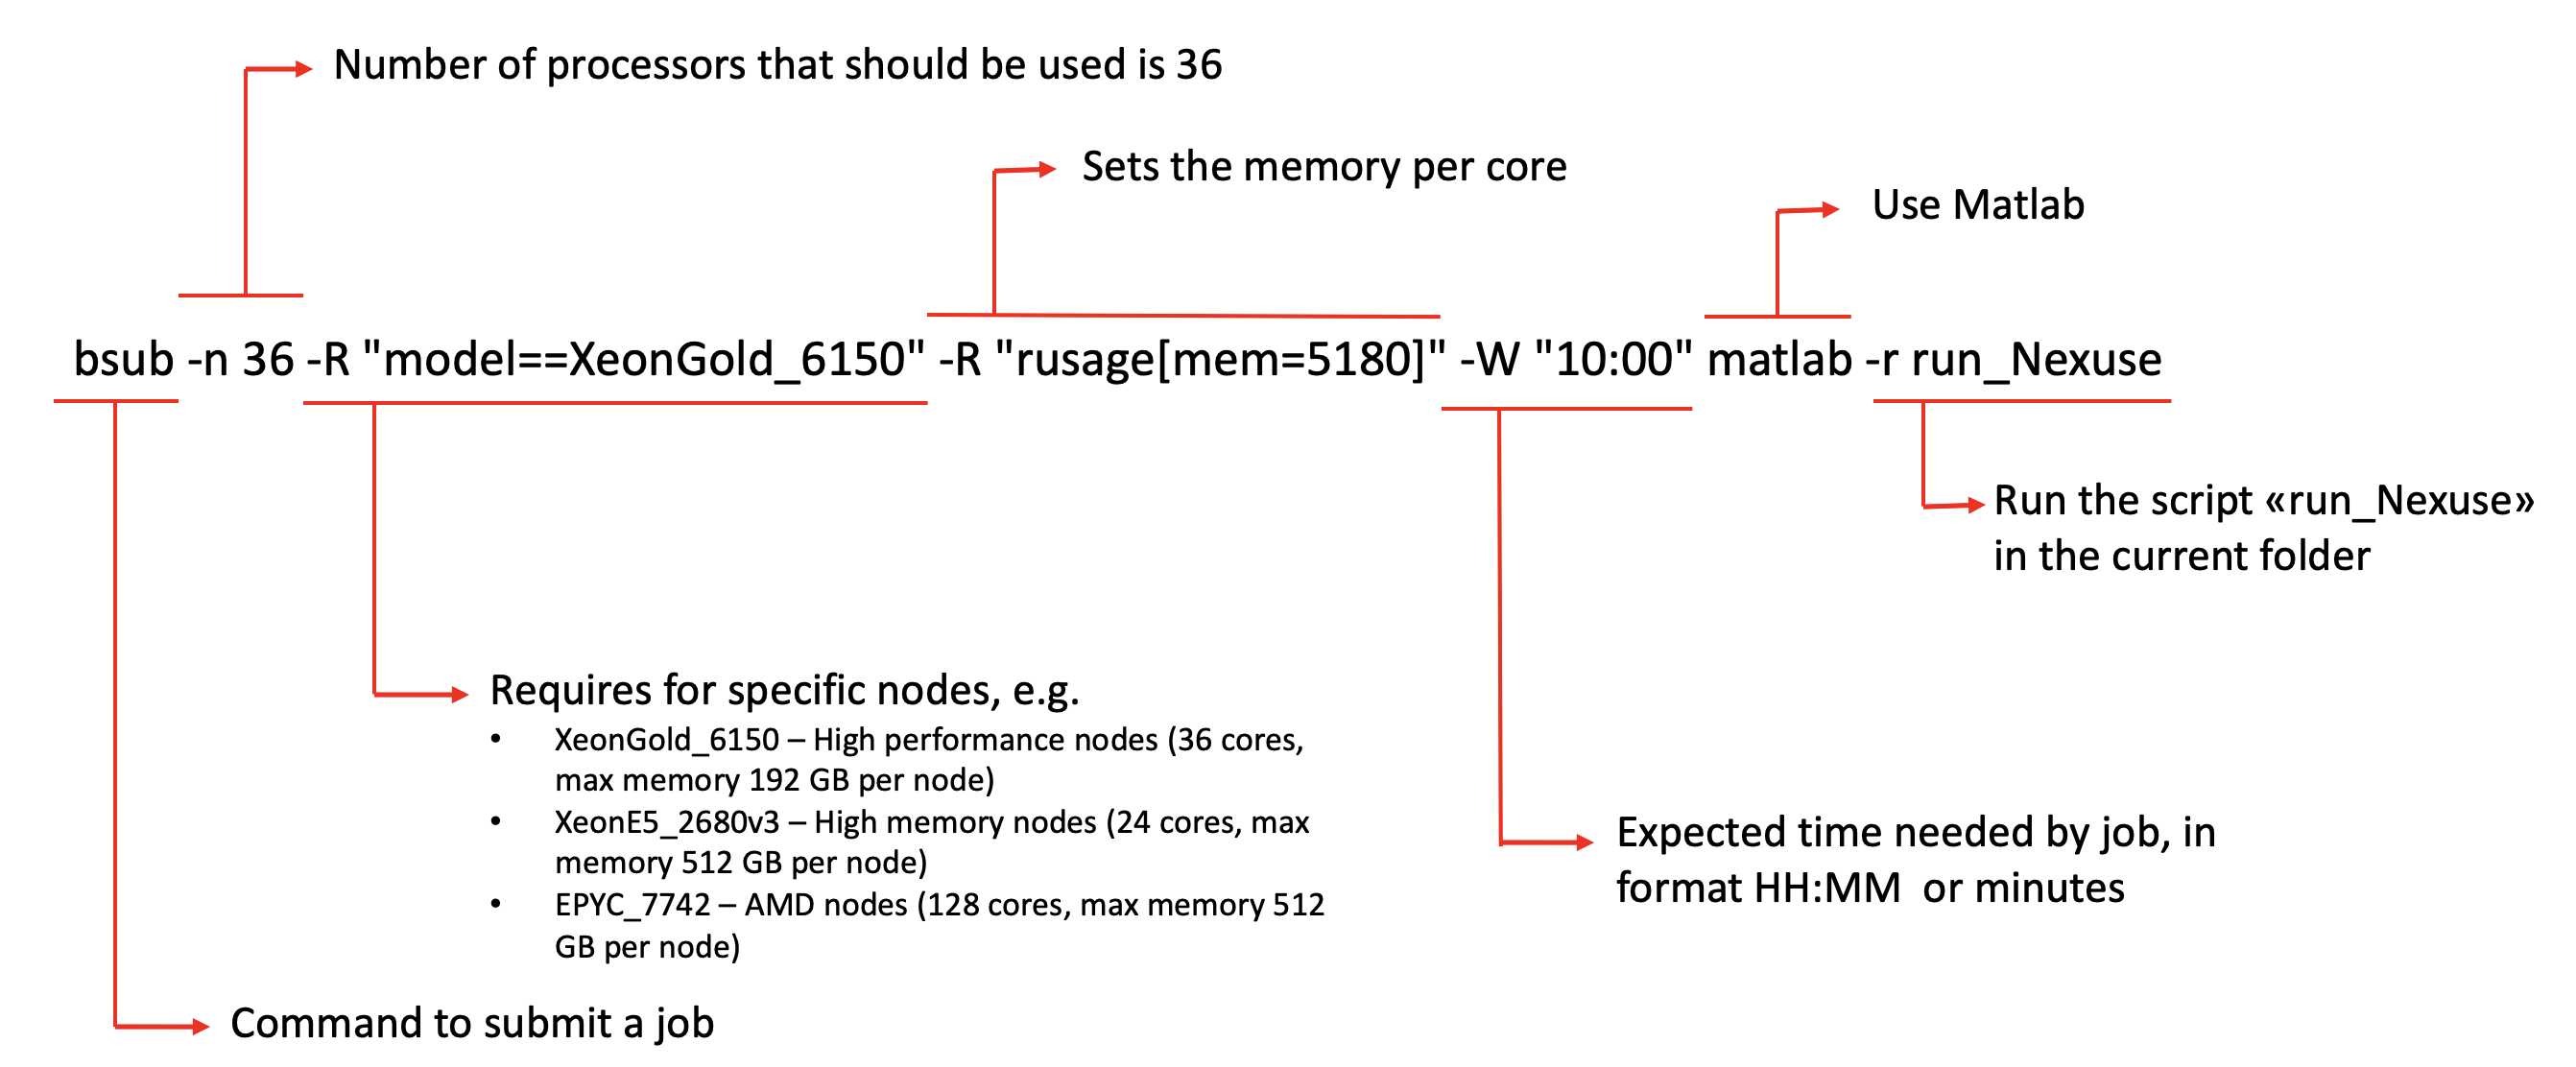
bsub -n 36 -R "model==XeonGold_6150" -R "rusage[mem=5180]" -W "10:00" matlab -r run_Nexuse
The parameters in this command can be costomized. Experience with resource usage to run Nexus-e with different time resolution and convergence criteria can be found here. General instructions on bash and Euler commands can be found here.
Here we give a short explanation to the example command above:
After submission, Euler will respond by telling you what the jobID is.
Consult Nexus-e team if you want to run other scripts in the
Run_Nexusefolder.
NOTE: For submissions that require large memory, it is recommended to select EPYC_7742, for submission with smaller memory requirements either select EPYC_7742 or XeonGold_6150.
⚠️ We have experienced issues with the database connector when computing node is not selected on Euler.