Repository instructions
For a full instruction to work with git repository, please see here.
This document is only used to demonstrate git operations for certain nexus-e-related questions and use cases:
-
Short answer: you “git clone” it from https://gitlab.ethz.ch/nexus-e/nexus-e-framework.git to a local folder.
What is the structure of the repository?
Short answer: it is an overarching repository called “nexus-e” containing sub-repositories (”submodules” is the official term in git).
I want to make changes in my own module. What should I do first?
Short answer: be aware of where you are in other modules. If needed, pull changes from other submodules.
-
Short answer: depending on the scale of your change - if small, you might want to copy the changed file(s) to Euler; if large, you might want to push the changes first then pull it on Euler.
I have fully tested my changes in my own module. What should I do now?
Short answer: push what you have tested (maybe not only your own module) into the overarching repo.
We recommend to use a git GUI (e.g. GitKraken, Git Extensions, SourceTree, and many more) to work with git locally. However, Euler doesn’t have a GUI, therefore you have to use command line there. In this documentation, we demonstrate with the GUI “GitKraken”. You can get a pro account for free as a researcher. The screenshots are taken from MacOS. There should be equivalent operations on other operating systems.
Why GitKraken:
It is stable in all operating systems (Linux, Mac, Windows)
It provides a good overview for the status of submodules, which is the key structure of our Nexus-e repo.
It has an embeded & very handy merging conflict resolution tool.
It is mature and well-documented.
How do I get the repository?
(1) Clone the overarching repo
 (2) Put in your credentials for the repo (normally your ETH account)
 (3) Initialize the submodules (select “Yes”)

Afterwards, you will see submodules getting initialized one by one (In the screenshot below there are 7 submodules. Since January 2021, it is reduced to 5 submodules.):

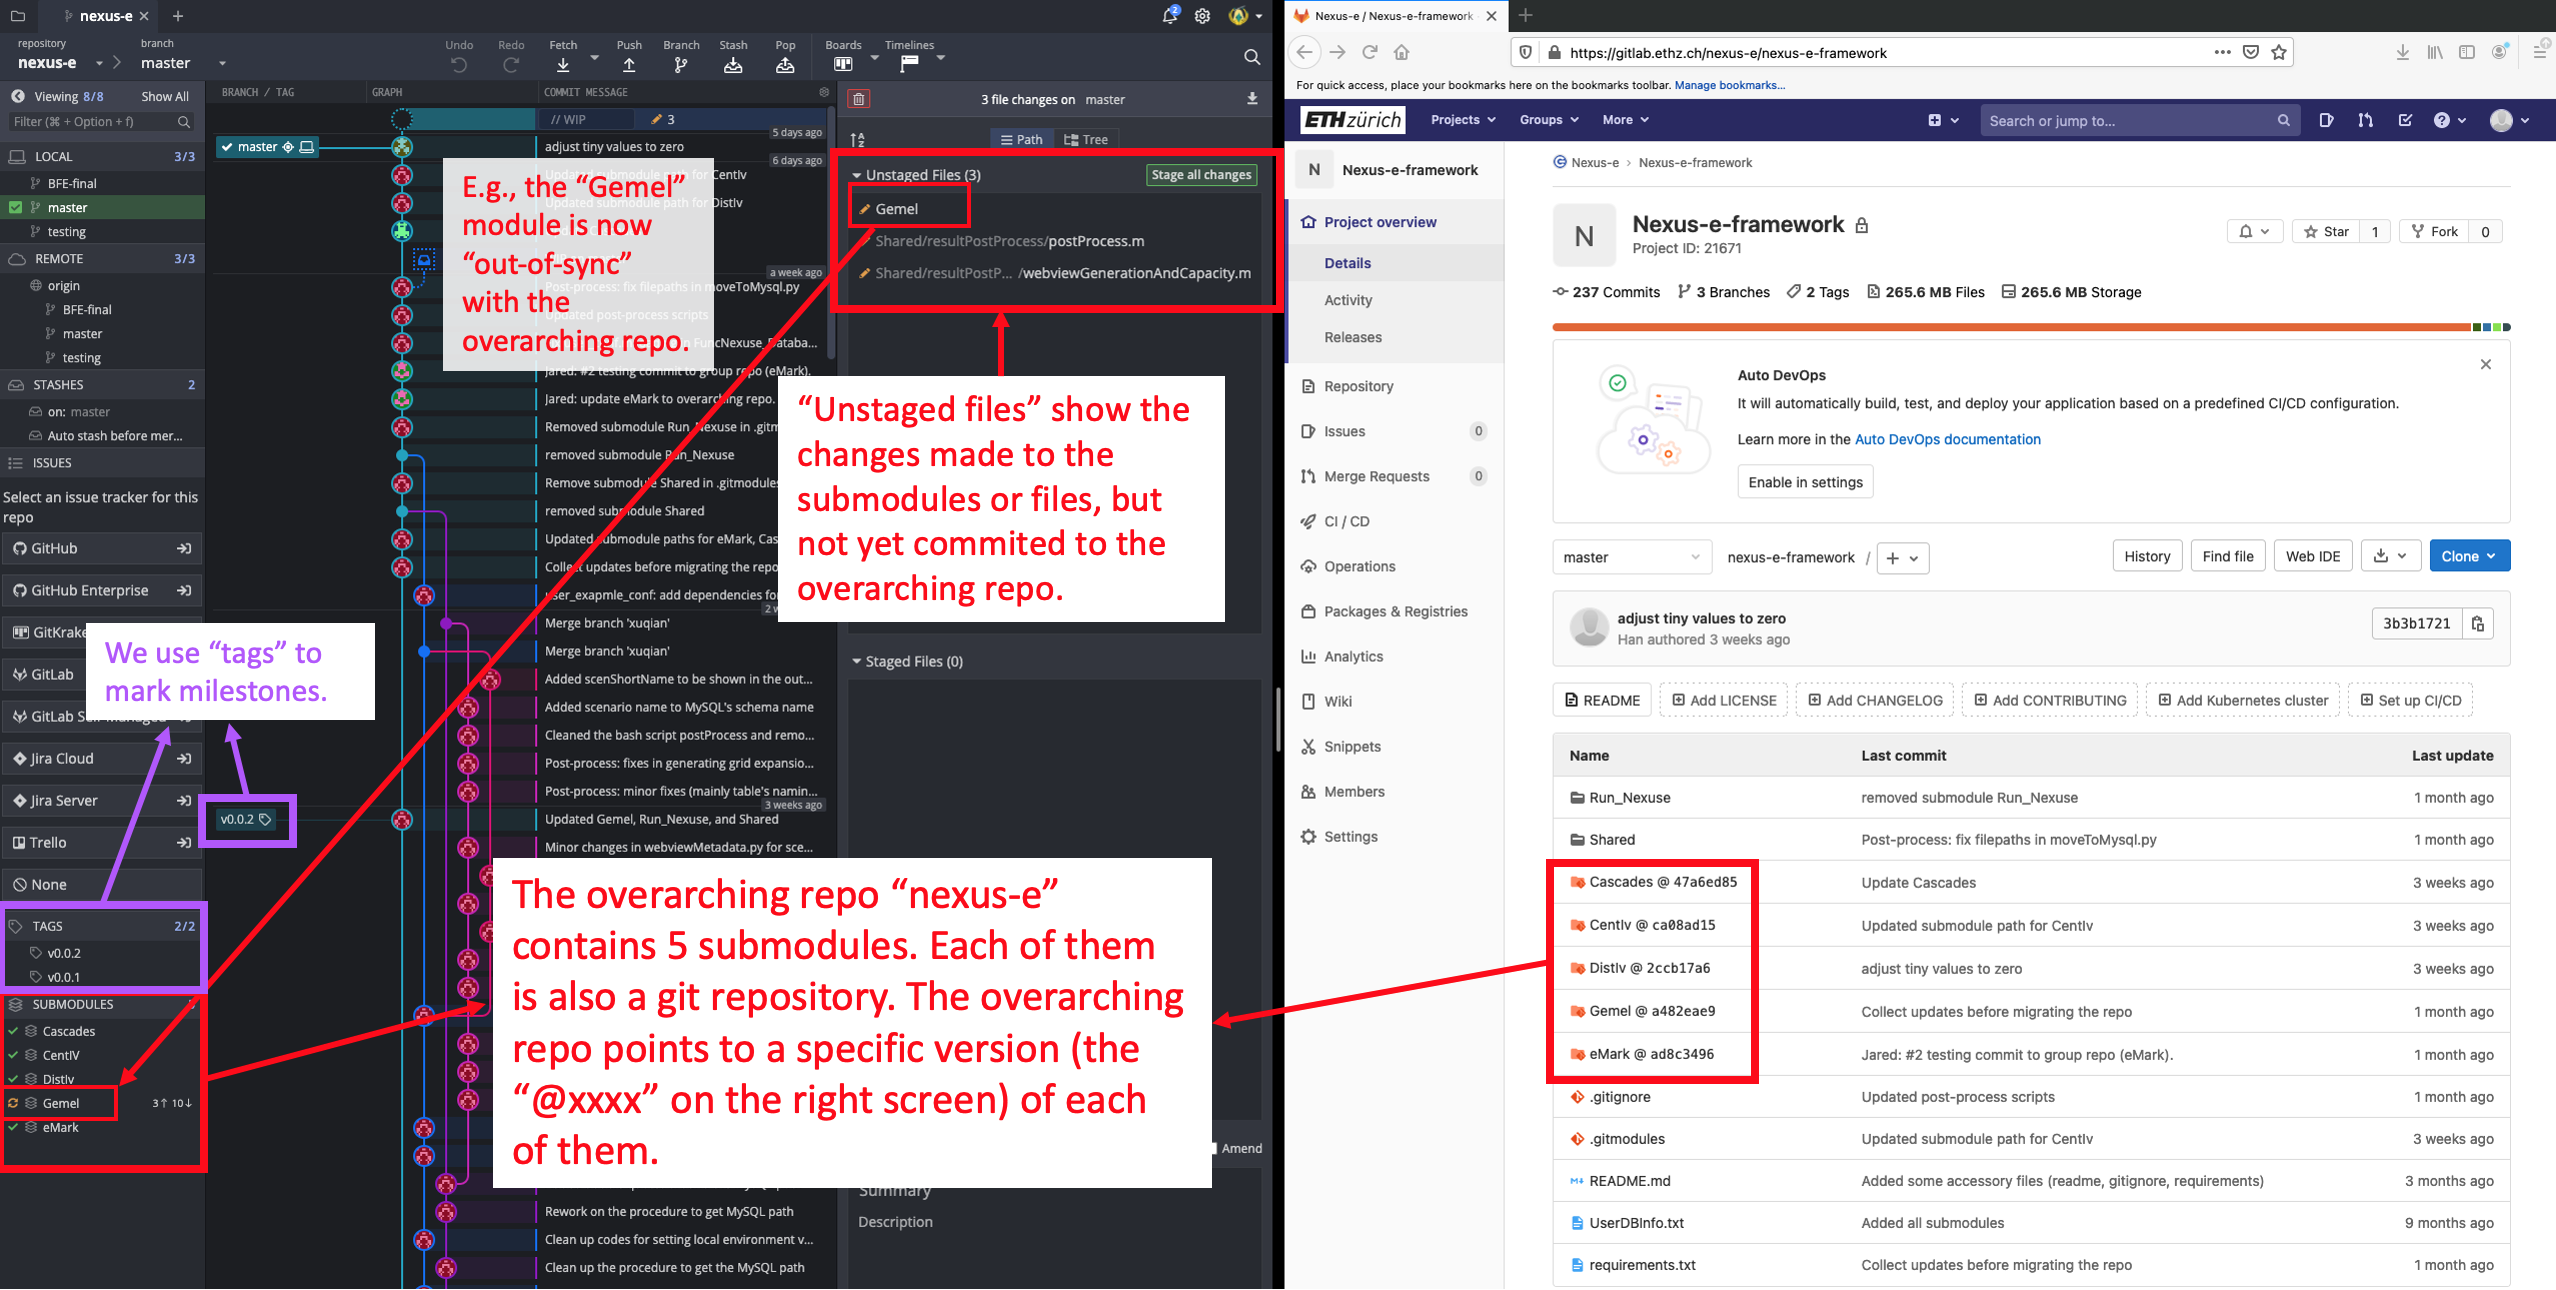
What is the structure of the repository?
To help with understanding, we show both interfactes in GitKraken (left) and in the repository (right).
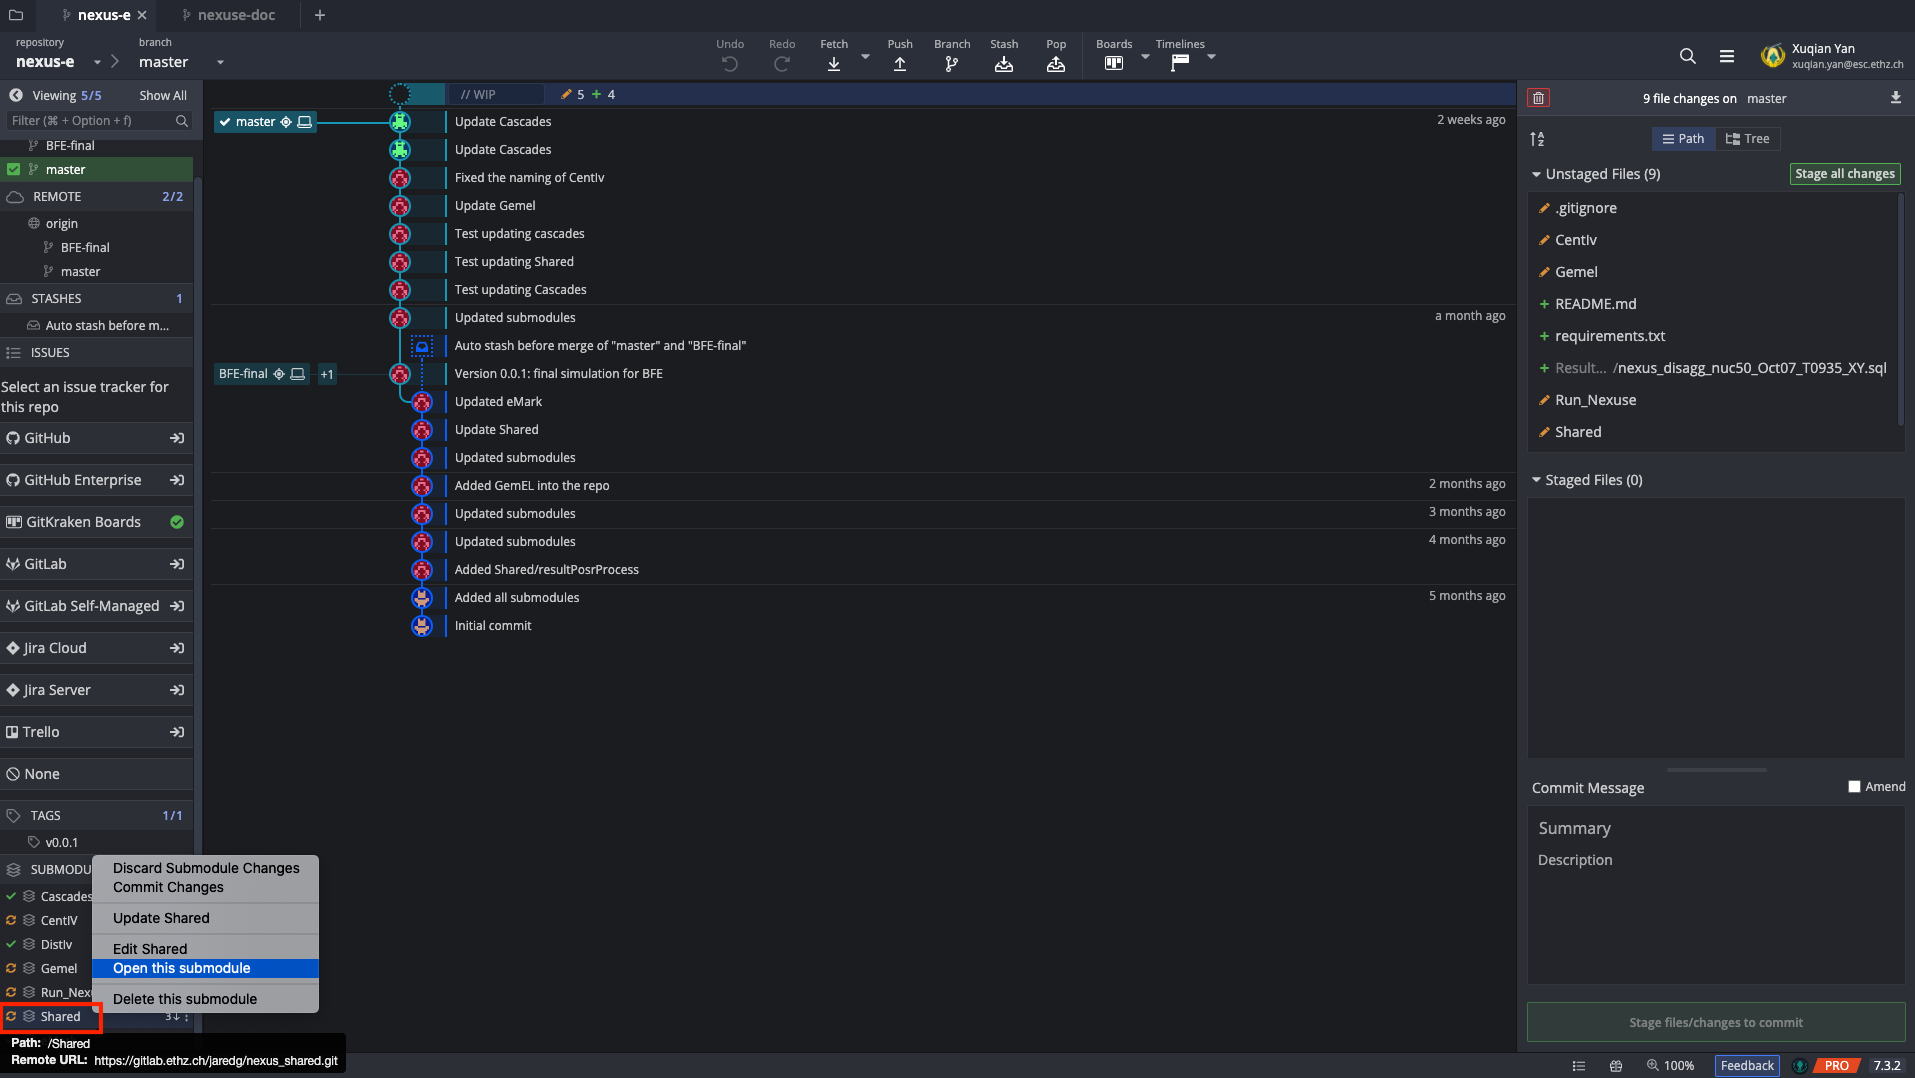
I want to make changes in my own module. What should I do first?
For example, you want to make changes in the “Shared” module. Note: Since January 2021, “Shared” is not a submodule anymore but a folder directly under the Nexus-e repository, but the procedures demonstrated here can be applied to any submodules.
(1) Open the submodule “Shared”.
 (2) After entering the submodule “Shared”, you might see such a structure.
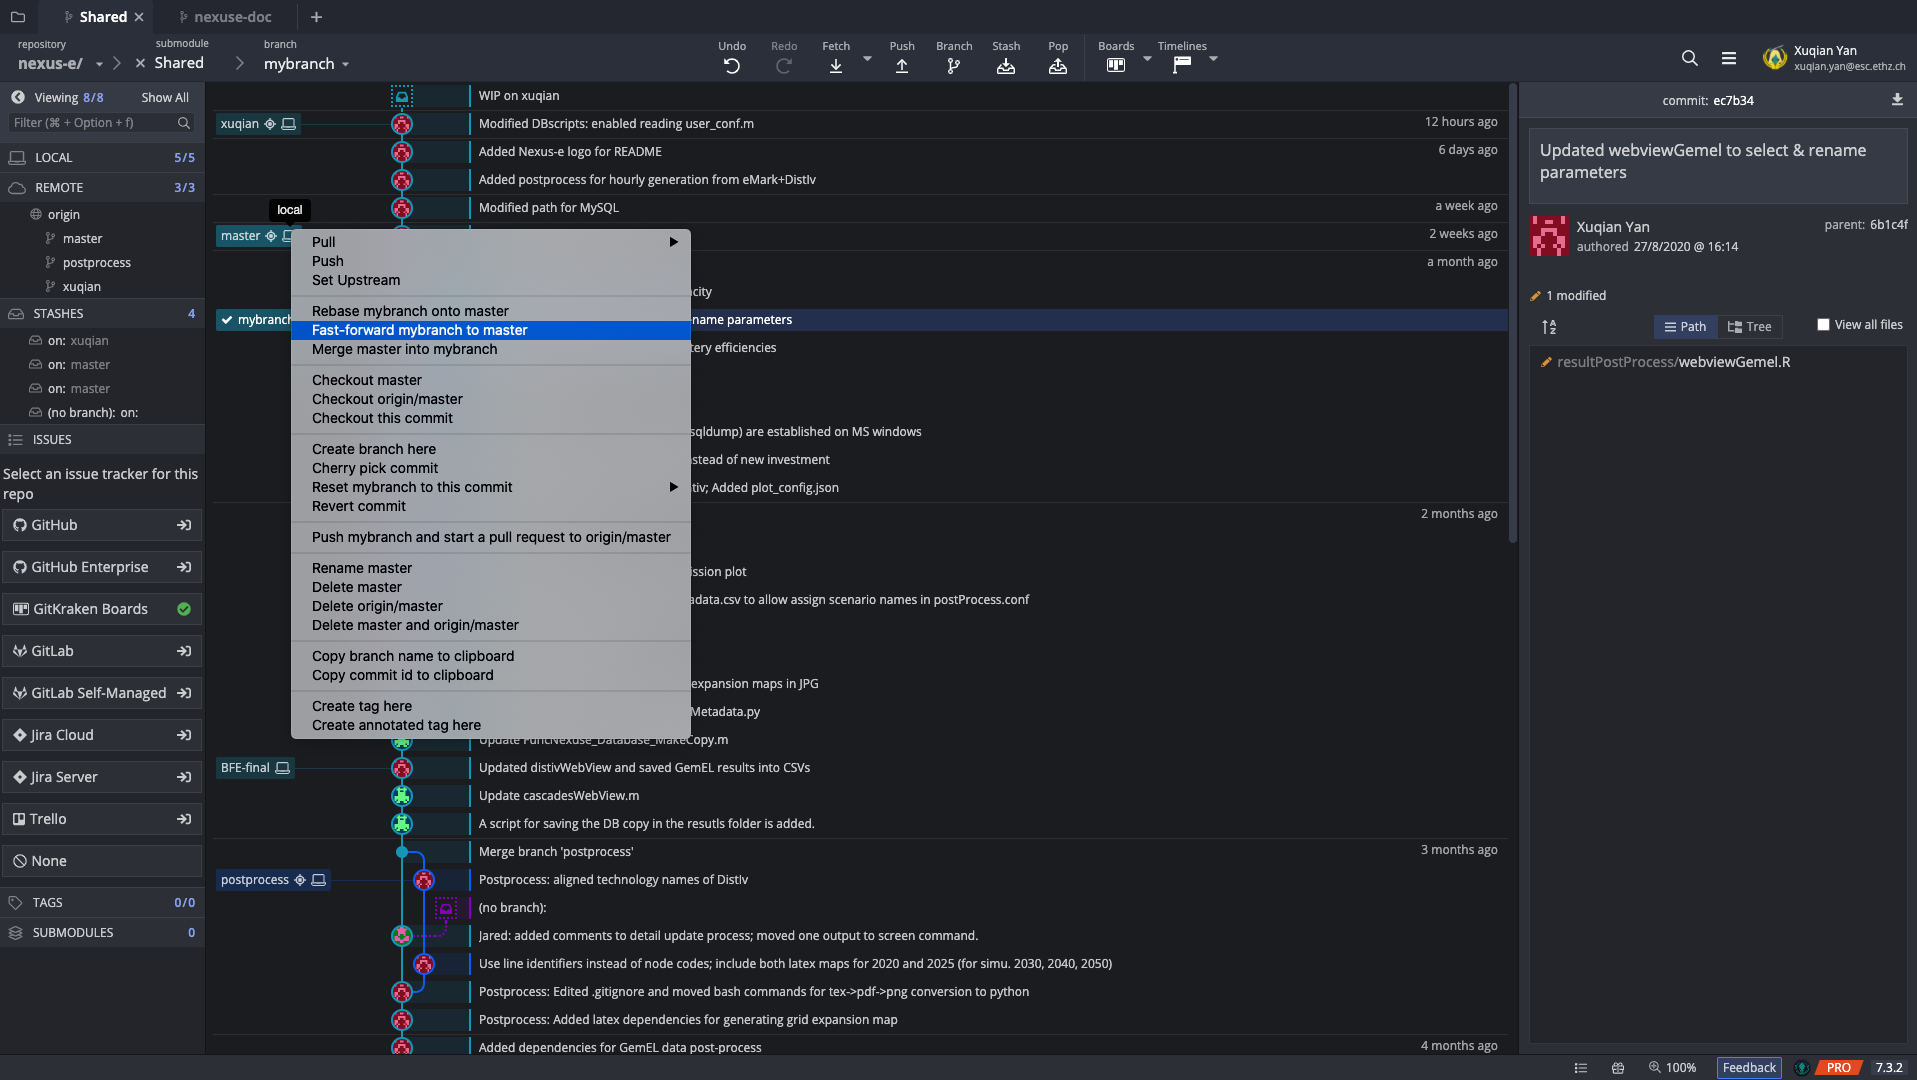
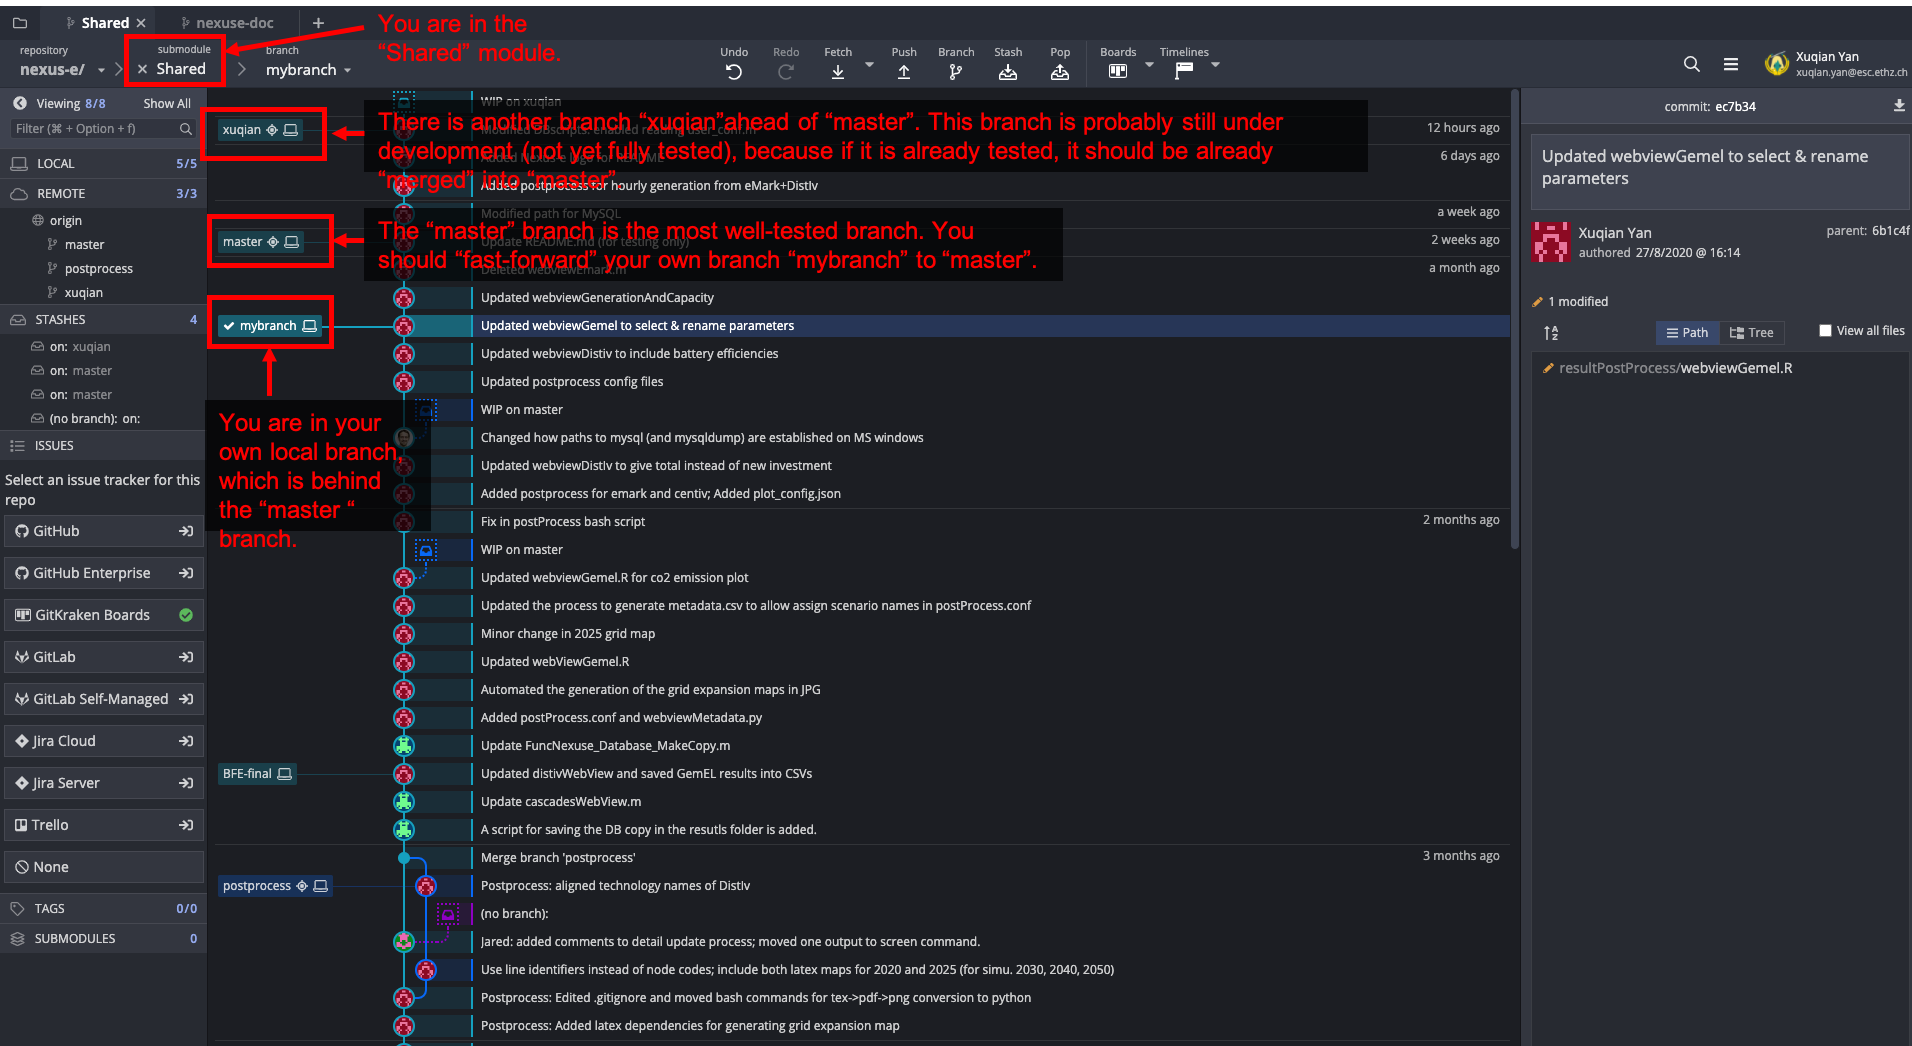 (3) Fast-forward your branch to “master” to make sure your local codes are up-to-date.
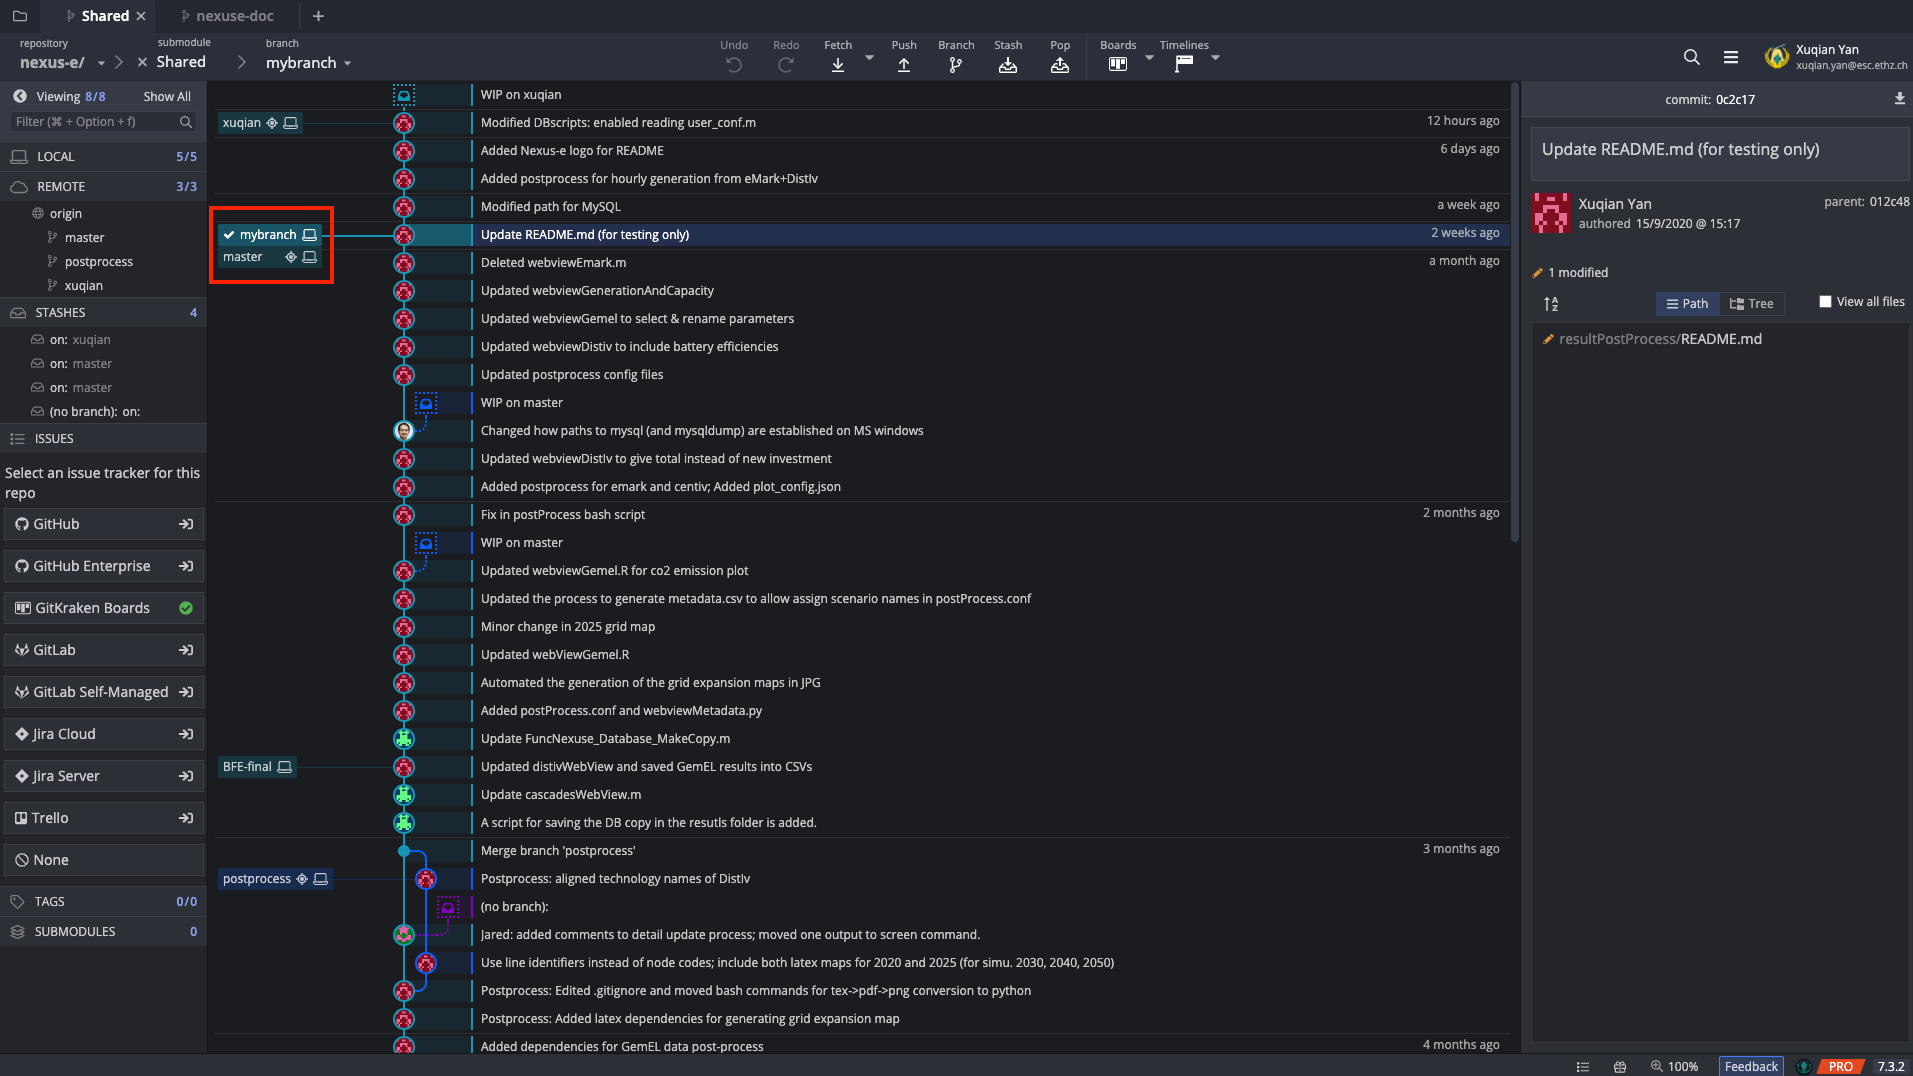
 (4) Now your own branch is at the same level as “master”.
 (5) Sometimes you might need to update other modules as well.
E.g., if your change in the “Shared” module depends on the newest changes in the “CentIv” module which is in the “target_branch” branch (doesn’t have to be the “master” branch), you will need to go through a similar procedure:
Enter “CentIv” submodule.
Fast-forward your own branch to the “target_branch”.
(6) In the end, you could enter all submodules one by one to make sure that you are at the right place in all of them.
I have made some changes in my own module and tested them in a small scale. How do I test them with the full Nexus-e platform?
To test the full platform, you will need to move your codes with your changes to Euler and run Nexus-e on Euler.
There are two ways to get codes to Euler: (1) copy from your local and (2) use git. Here we list the pros, cons, and use cases of both ways. You could decide which way to use.
Comparison
Copy from local
Pro: (1) This can be done with a GUI tool. (2) You don’t need to push to the repository first.
Con: (1) Copying the whole Nexus-e folder takes time (a few minutes). (2) If you only copy selected files where you have made changes, you might by accident forget some.
When to use: (1) when you need to test small changes that you don’t want to push to the repository yet, and (2) when you can’t push to git, e.g., when you made changes in a repo where you don’t have permission to push.
Git
Pro: (1) Using git gaurantees that what you run on Euler is exactly the same as in the repository. (2) It is fast because only updated files will be reloaded by git and some files (e.g. results) are ignored by git.
Con: (1) You need to run git commands in a terminal (no GUI). (2) You need to push your codes to the repository first and then pull it to Euler
When to use: (1) When you want to test what is already in the repository, and (2) when you have made lots of changes to the codes and you might forget some files when you copy them to Euler manually.
Copy from local
Use a graphical tool to transfer files between Euler and your local computer.
Copy your whole Nexus-e folder (you don’t have to copy the “Results” folder) to Euler.
Alternatively, you could also only copy individual files where you made changes, but you risk forgetting some files or forgetting to update some modules on Euler.
Use git
In this section, we assume that you already have Nexus-e codes on Euler, so you only need to update the codes where you have made changes. If this is not the case, follow the section Euler setup.First, make sure to have a clean start - be aligned with the most updated commit in the overarching repository.
(1) On Euler, go to the folder where you put the Nexus-e codes. e.g.,
cd nexus-e
(2) Update the codesDelete your local changes (e.g., your edits in “run_Nexuse.m”)
git reset --hardPull changes from the overarching repository
git pullUpdate the submodules
git submodule update(Optional) Check the commit numbers of each submodule
git submodule foreach "git rev-parse HEAD"
Then, go to the individual submodules where you want to pull changes that are not in the overarching repository. For example, you want to test your changes in the “Shared” submodule which is pushed to a branch named as “postprocess”.
(1) Go to the folder where you want to pull the changes, e.g.,
cd Shared
(2) Check which branch you are at right now withgit branch
E.g., in the screenshot below, it is at the “xuqian” branch (seen from the “*” sign) and there is no “postprocess” branch yet.
(Note: This is the most complicated case. For example, if you already have the “postprocess” branch and you are already at the “postprocess” branch, you could skip the following steps and only rungit pull. See more information on switching branch with git checkout and updating the current branch with git pull.)
(3) Fetch the origingit fetch origin
(4) Pull changes in the “postprocess” remote branch withgit pull origin postprocess
You will see the following message asking for your credentials for the “Shared” repo.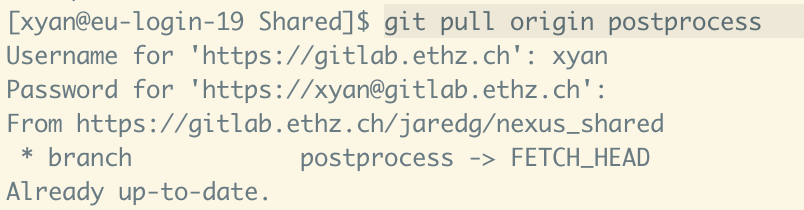
(5) Create and check out local branch “postprocess” withgit checkout -b postprocess origin/postprocess
(6) Check your branch again withgit branchto make sure that you are at the “postprocess” branch.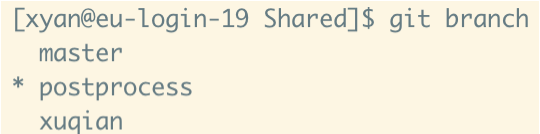
Sometimes you need to do the branch switching (as instructed in the step above) for other submodules as well. From here, you should already know which branch you are at in each submodule.
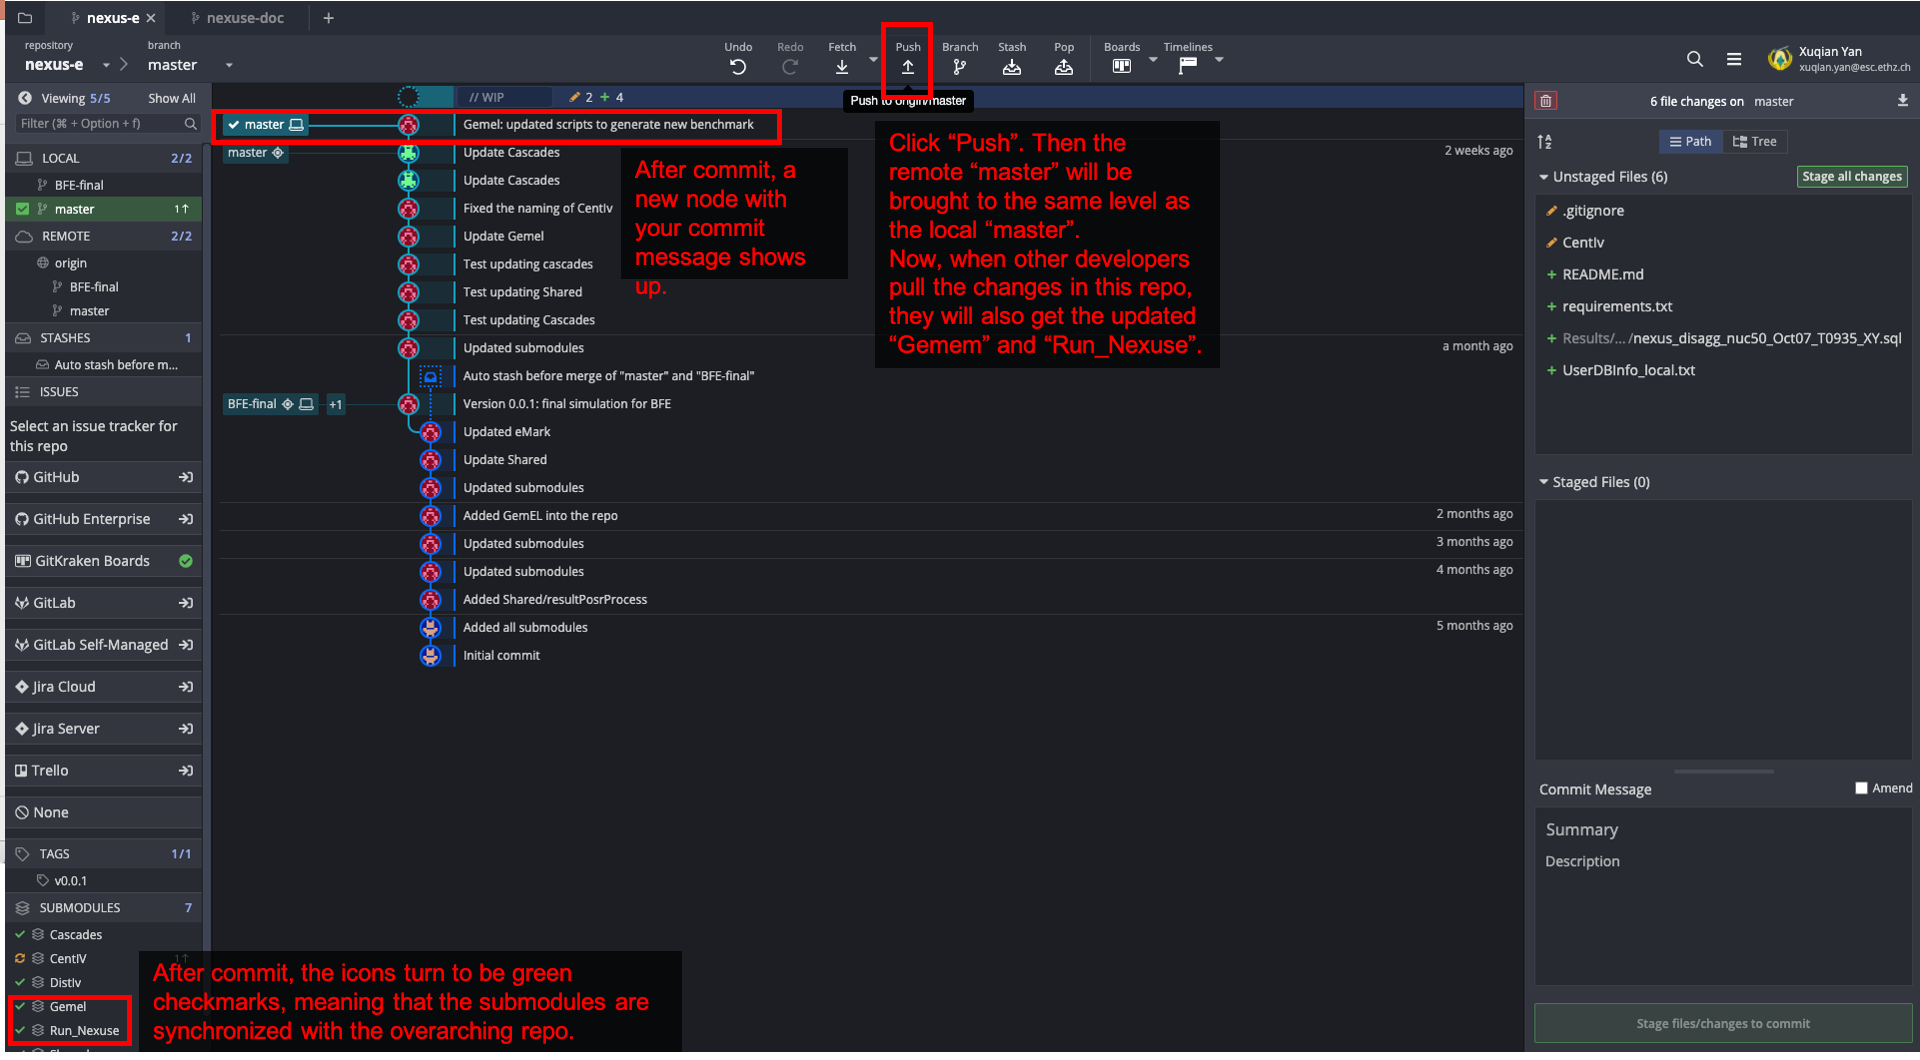
I have fully tested my changes in my own module. What should I do now?
For example, you have made changes on the branch “florian” in the submodule “Gemel”. The changes have been tested together with the updated module “Run_Nexuse”. Now you are confident about the codes and you want other researchers also use your updates.
Note: Since January 2021, “Run_Nexuse” is not a submodule anymore but a folder directly under the Nexus-e repository, but the procedures demonstrated here can be applied to any submodules.
(1) Enter the “Gemel” submodule.
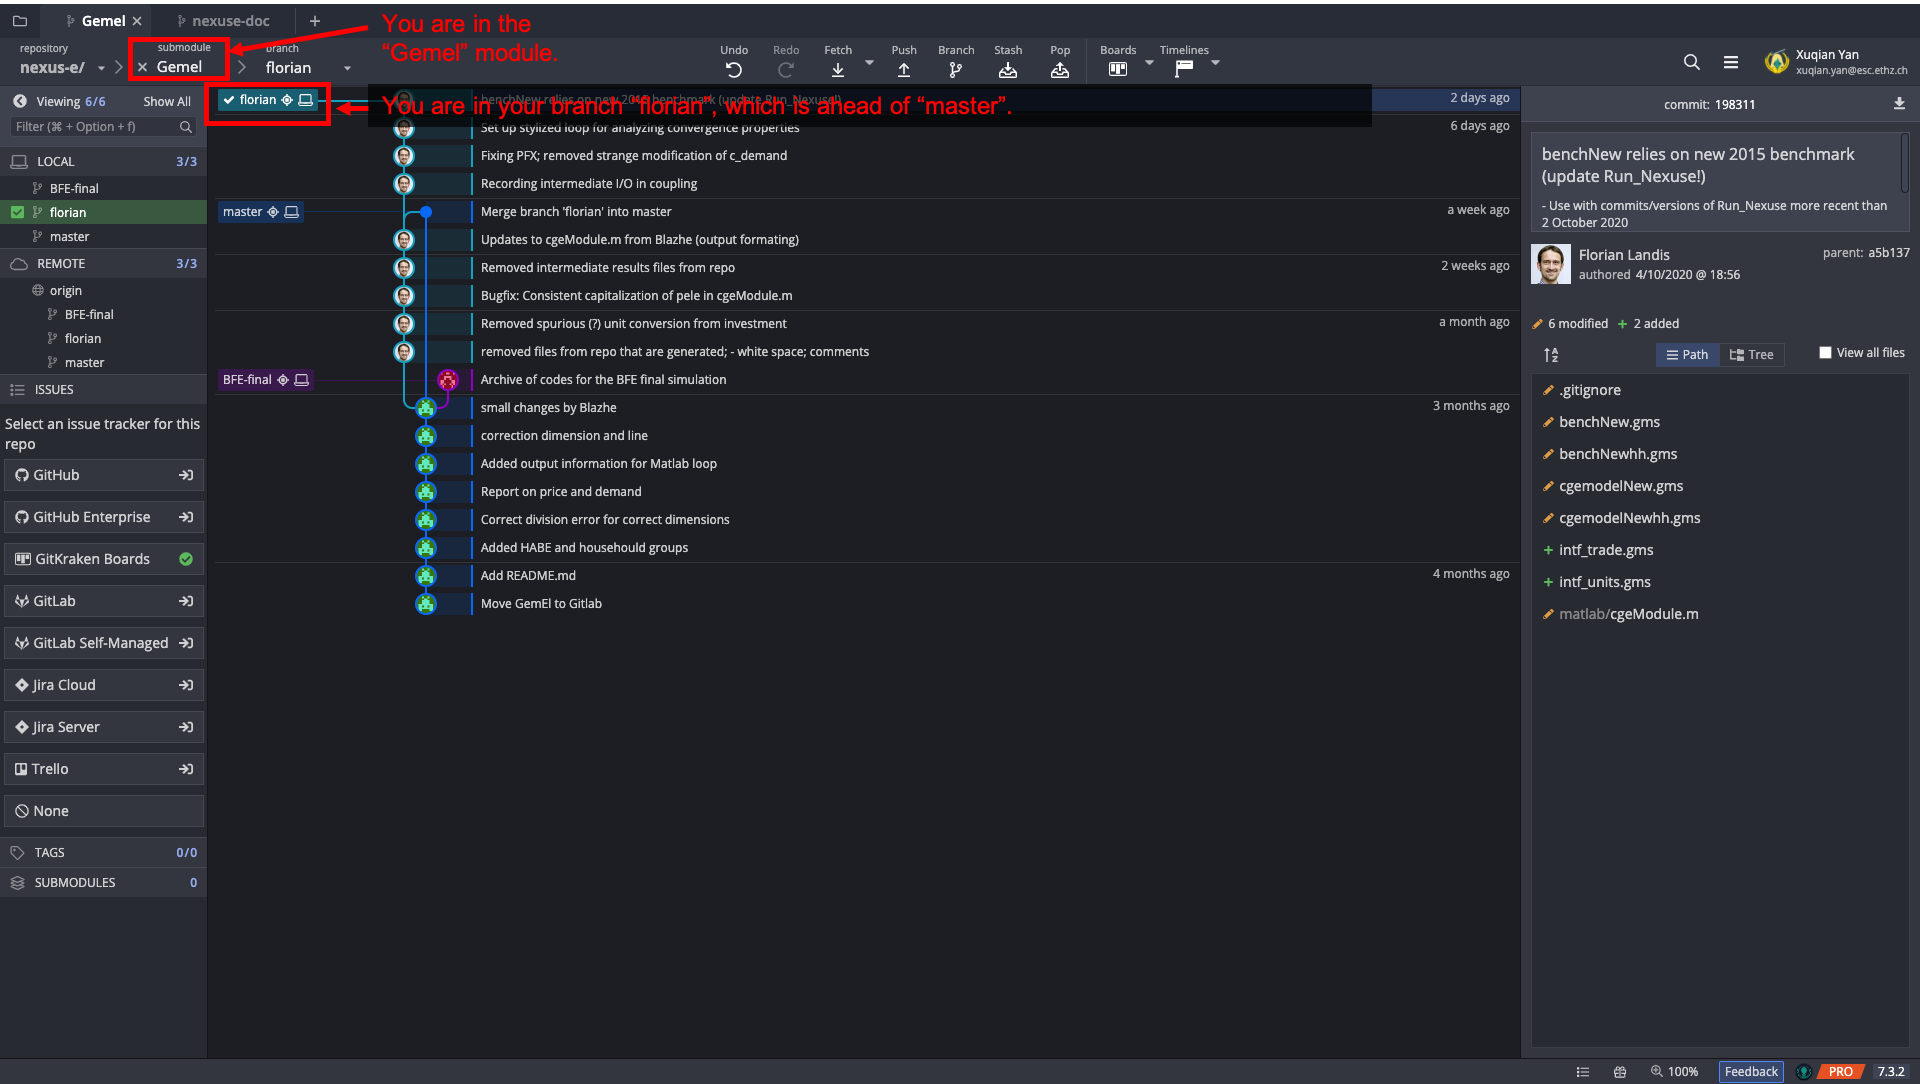
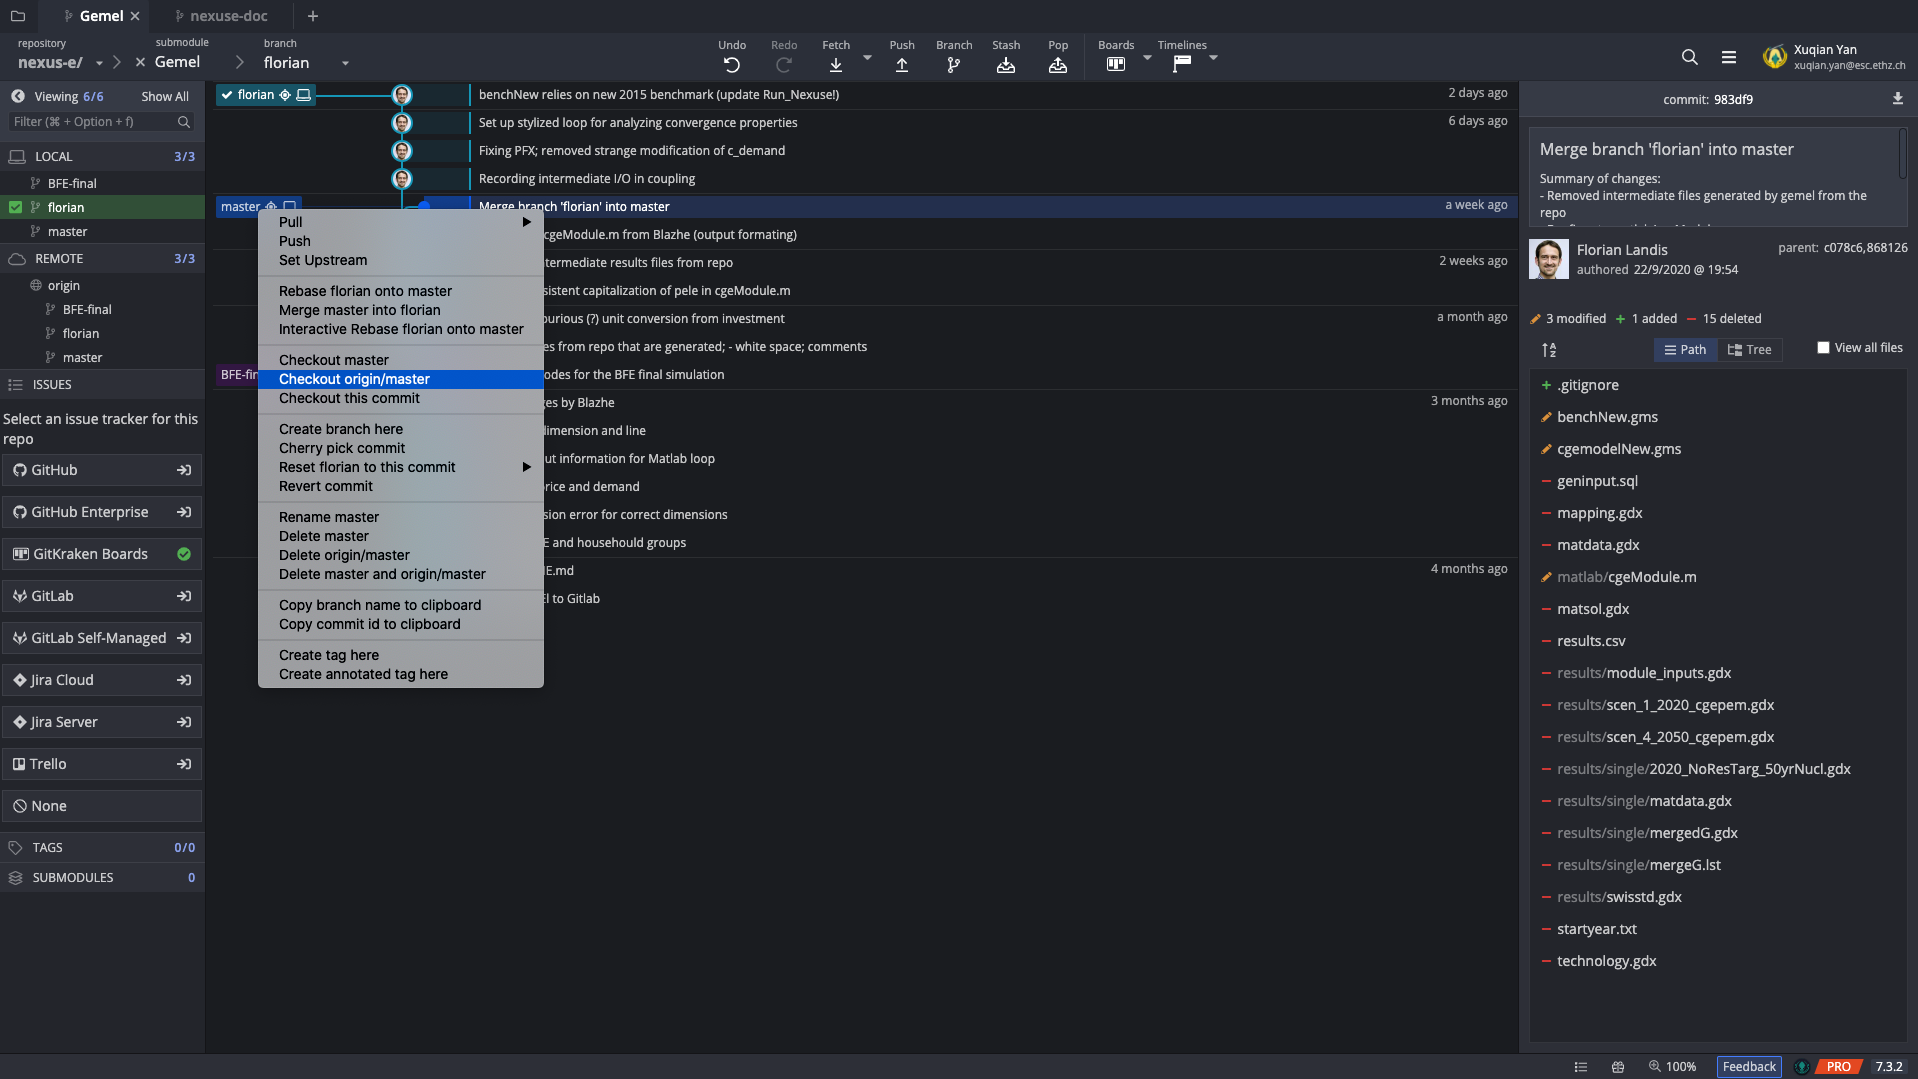
(2) Checkout origin/master
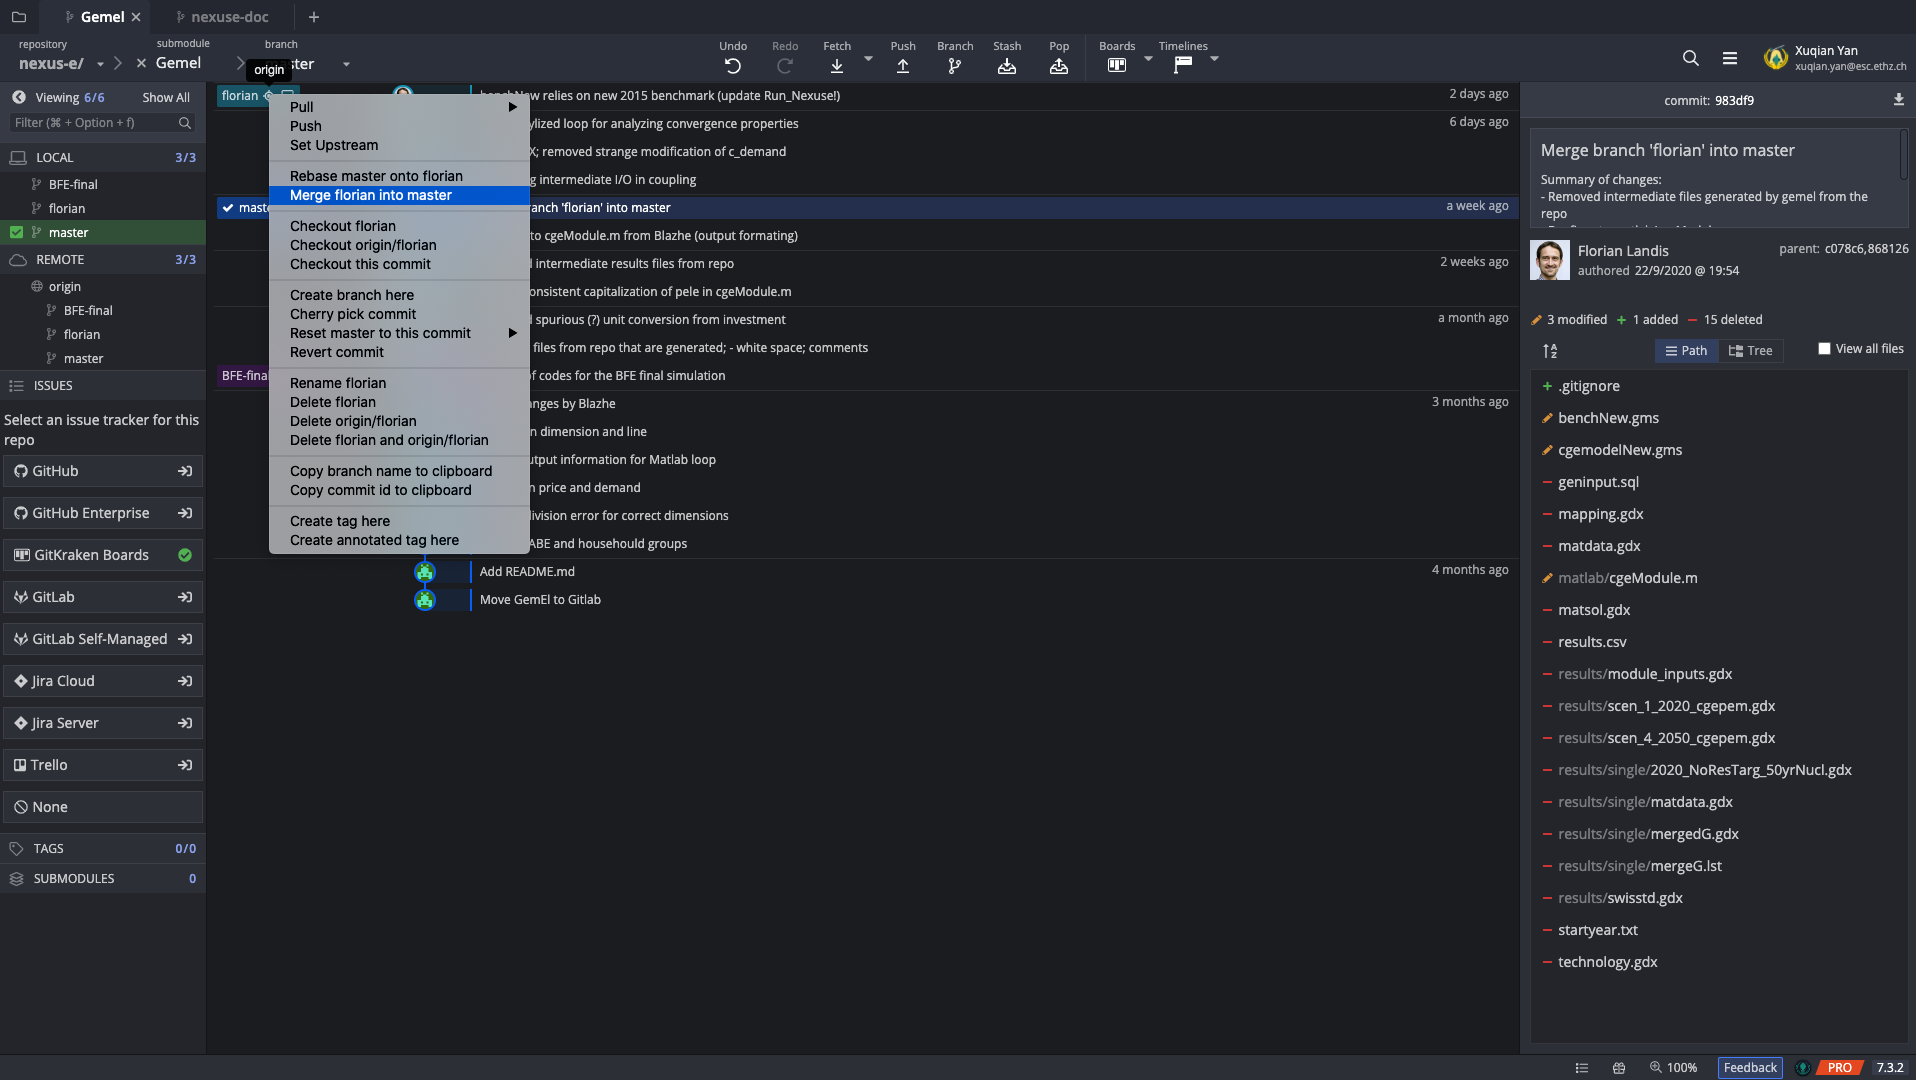
(3) Merge “florian” into “master”
(4) Push the “master” branch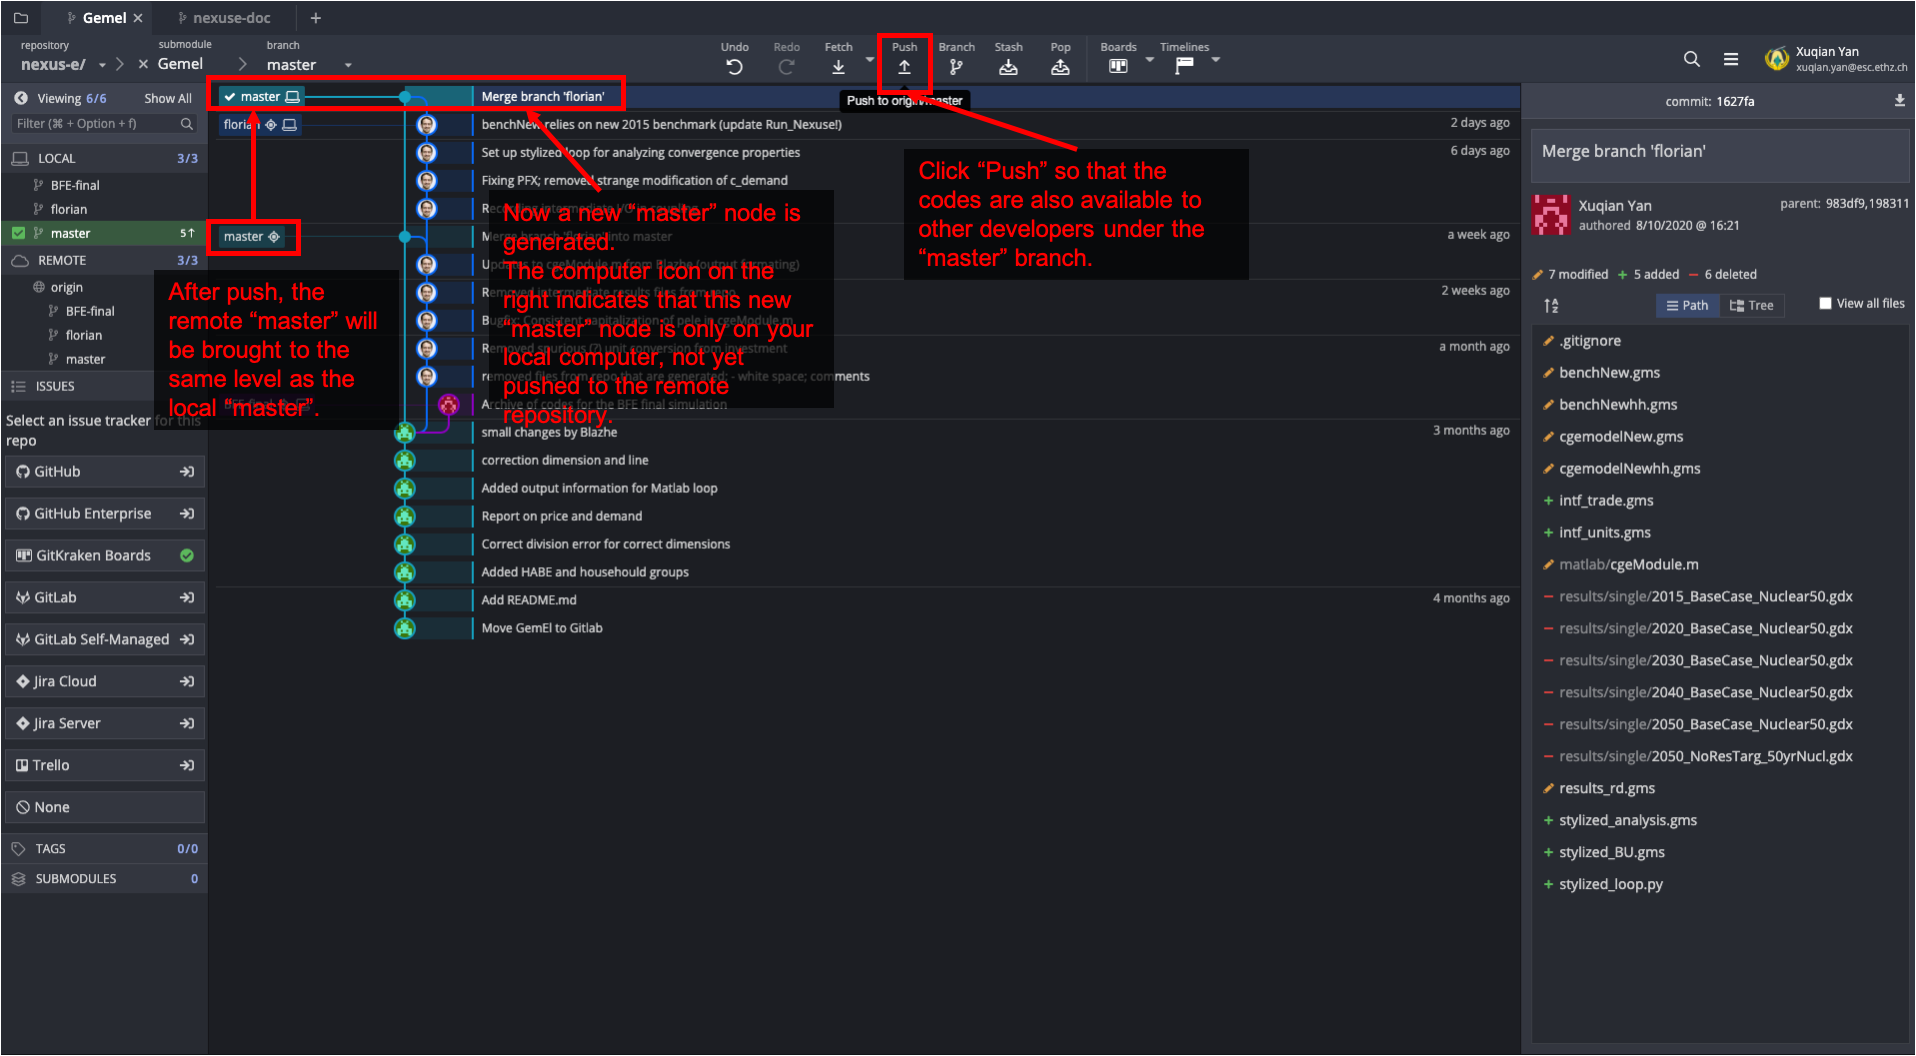
(5) Enter the “Run_Nexuse” submodule and make sure you are at the right commit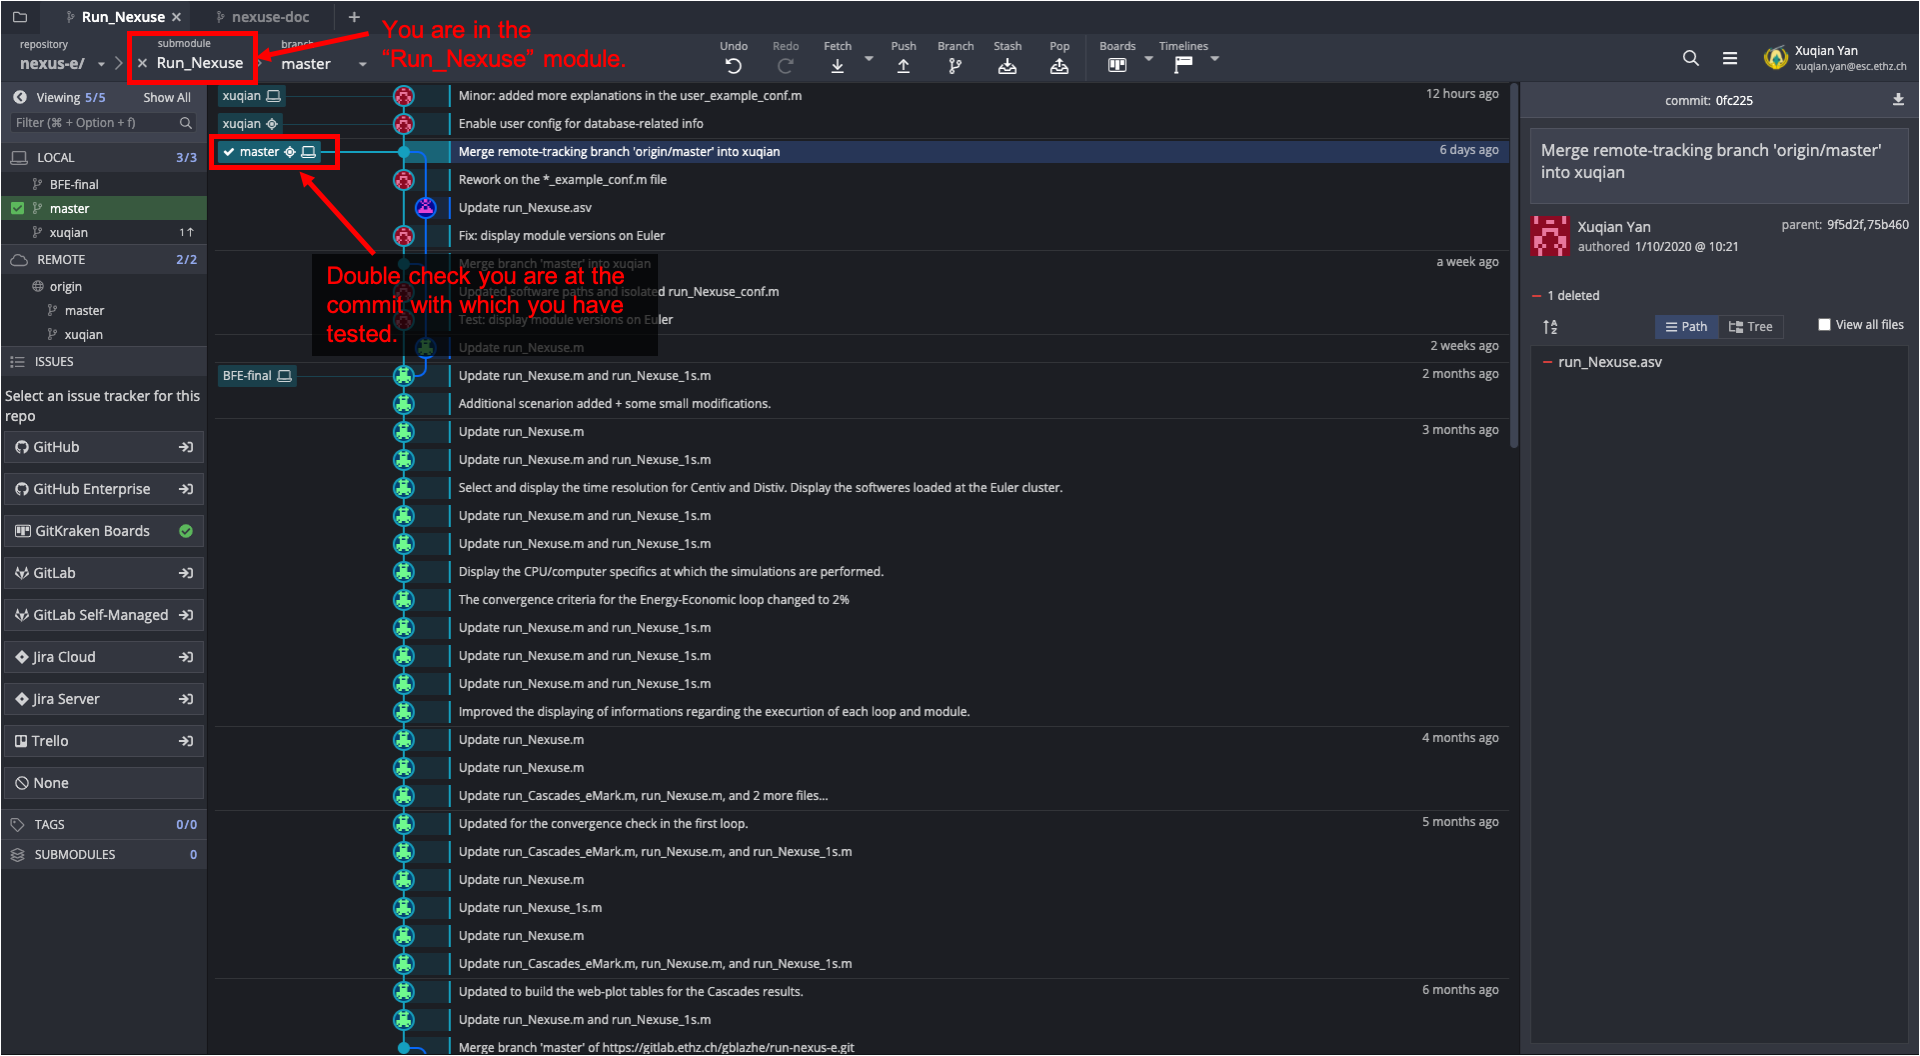
(6) Go back to the overarching repo, stage the “Gemel” and “Run_Nexuse” modules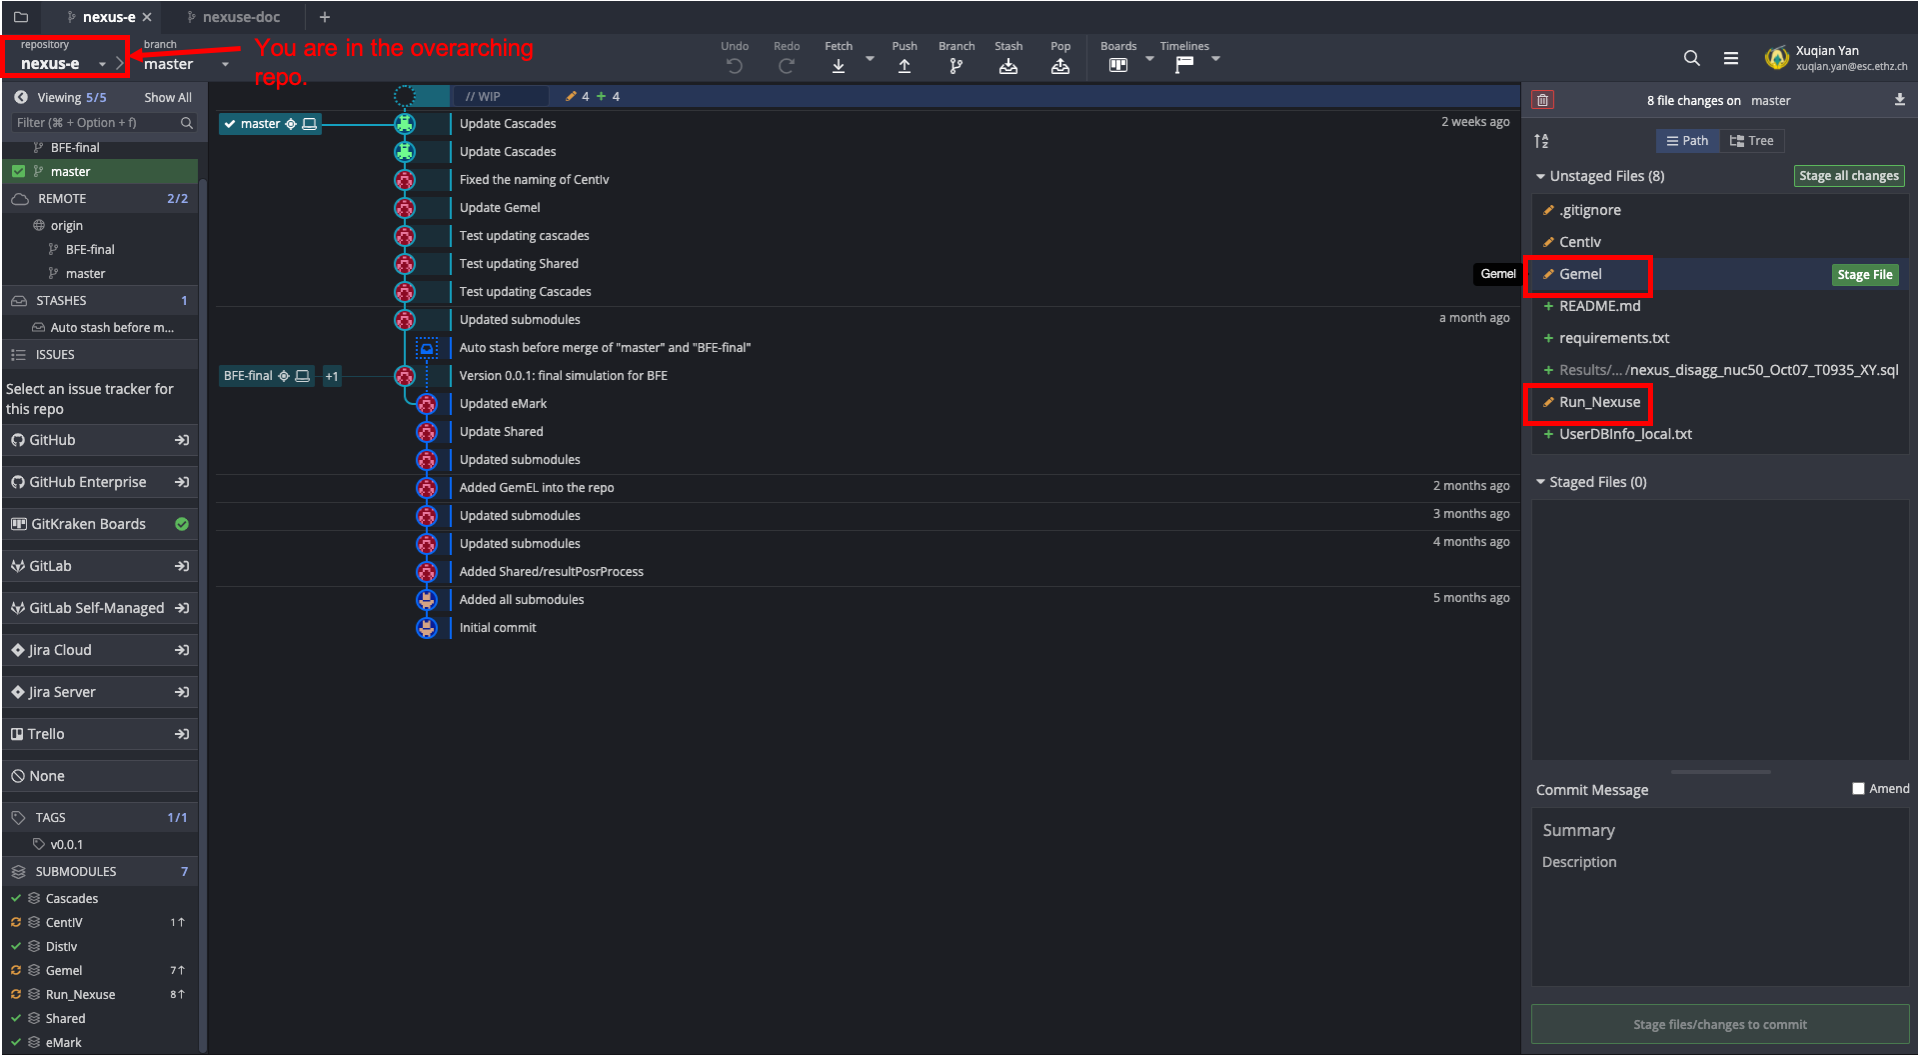
(7) Commit your changes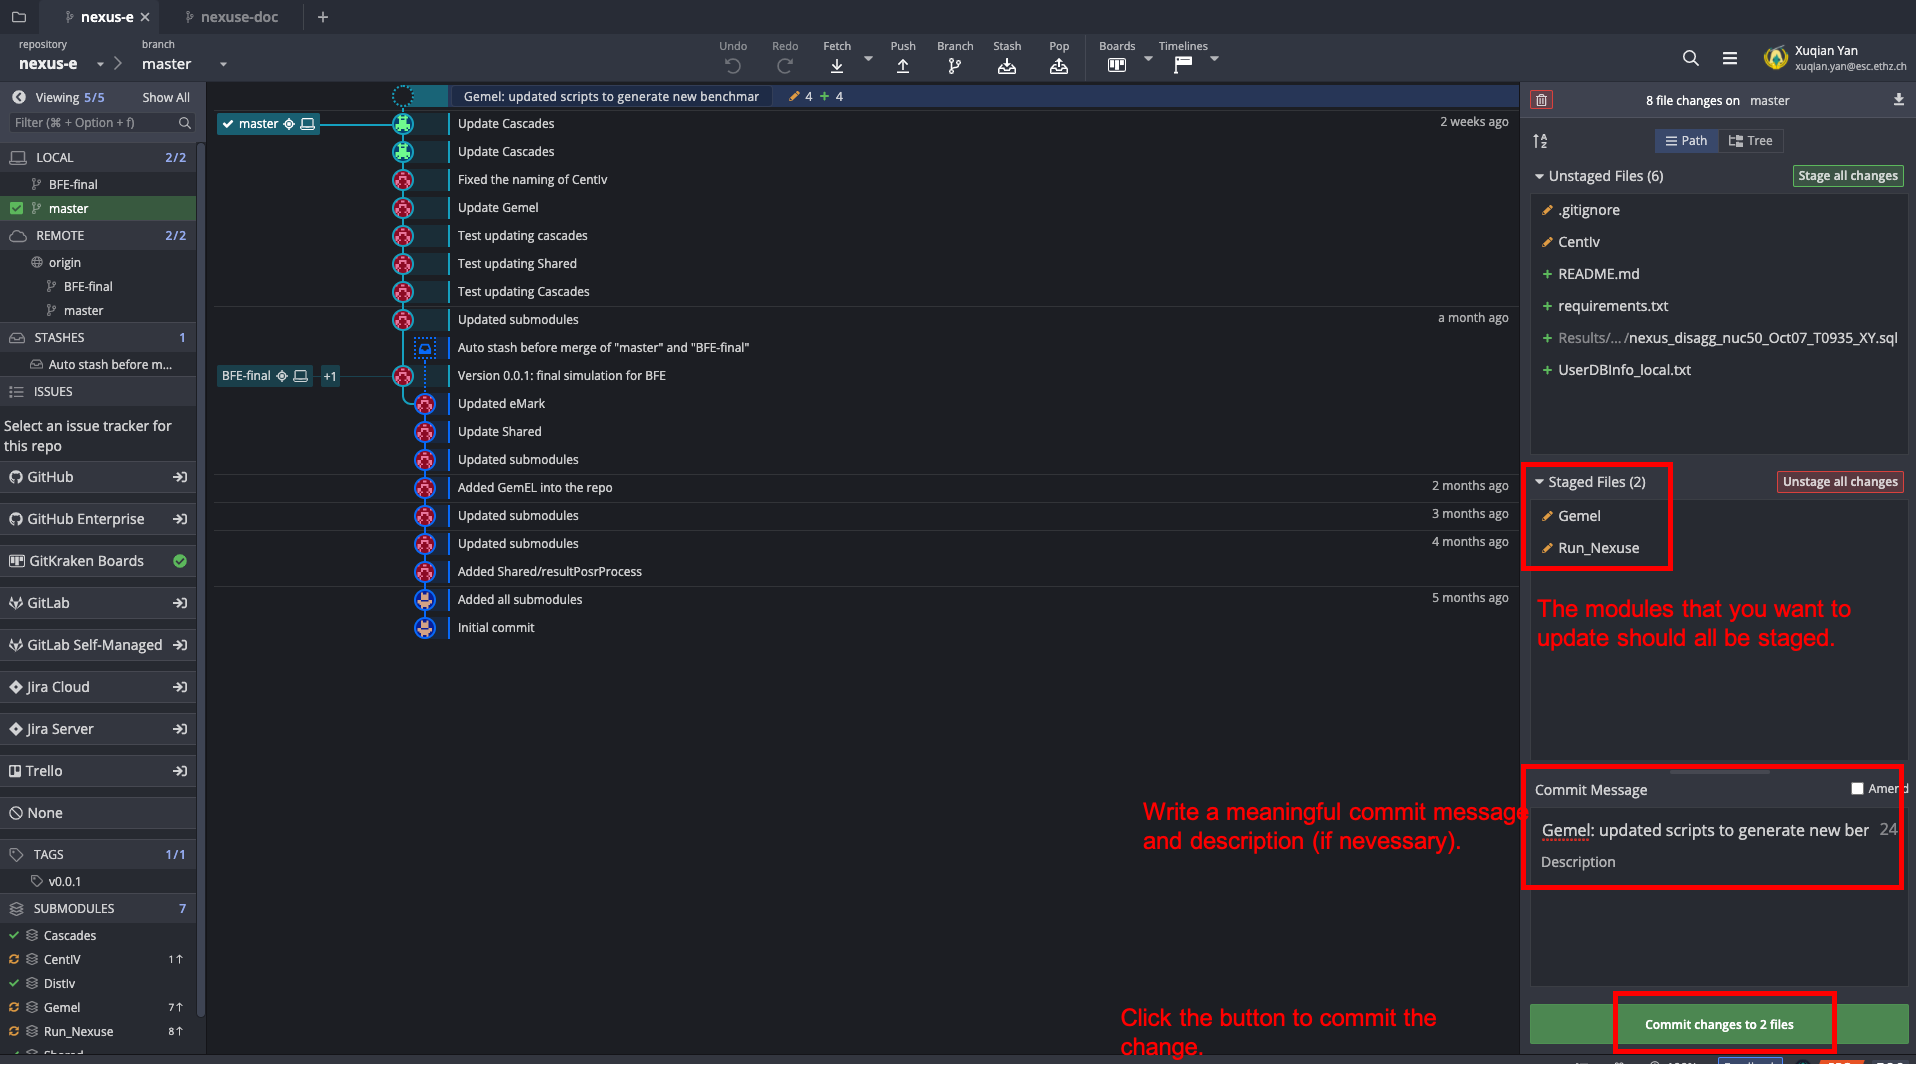
(8) Push your changes