Modify input data
Input data for Nexus-e are organized in two ways: (1) Collected in one common MySQL database and (2) Stored separately in each module. When modifying input data, you first need to figure out where the data is stored, and then take the corresponding approach to modify.
Where the input data are stored
Input data for Nexus-e are organized in the following two ways.
(1) Stored in one common MySQL database
By gathering input data in one common database, (1) it alignes the data used by different modules, (2) it easies the procedure to tune the parameters, and (3) the data become more transparent and have a clearer structure. Data that are collected in the database include - data that are used by multiple modules (e.g., grid parameters) - data that vary across scenarios (e.g., macroeconomic assumptions)
The structure of our current database can be found here.
(2) Stored separately in each module
Storing data separately saves the effort to transfer the data into/out of the database. This is especially beneficial for complex data formats, because MySQL is only suitable for table-like data formats and other small & simple data formats that can be transformed into a BLOB. Data that are stored separately include - data that are only used for one module - data that do not need to be changed frequently - data with a complex format
How to modify
If the data is stored within a certain module, contact the module owner (i.e., the administrator of the module’s repository).
If the data is stored in the input database, tutorial videos on how the database is created and how one can modify the input data can be found in Polybox
00_Administration/05_Internal Meetings/2021/2021.05.03_MySQL-Tutorial. Here we briefly describe the workflow: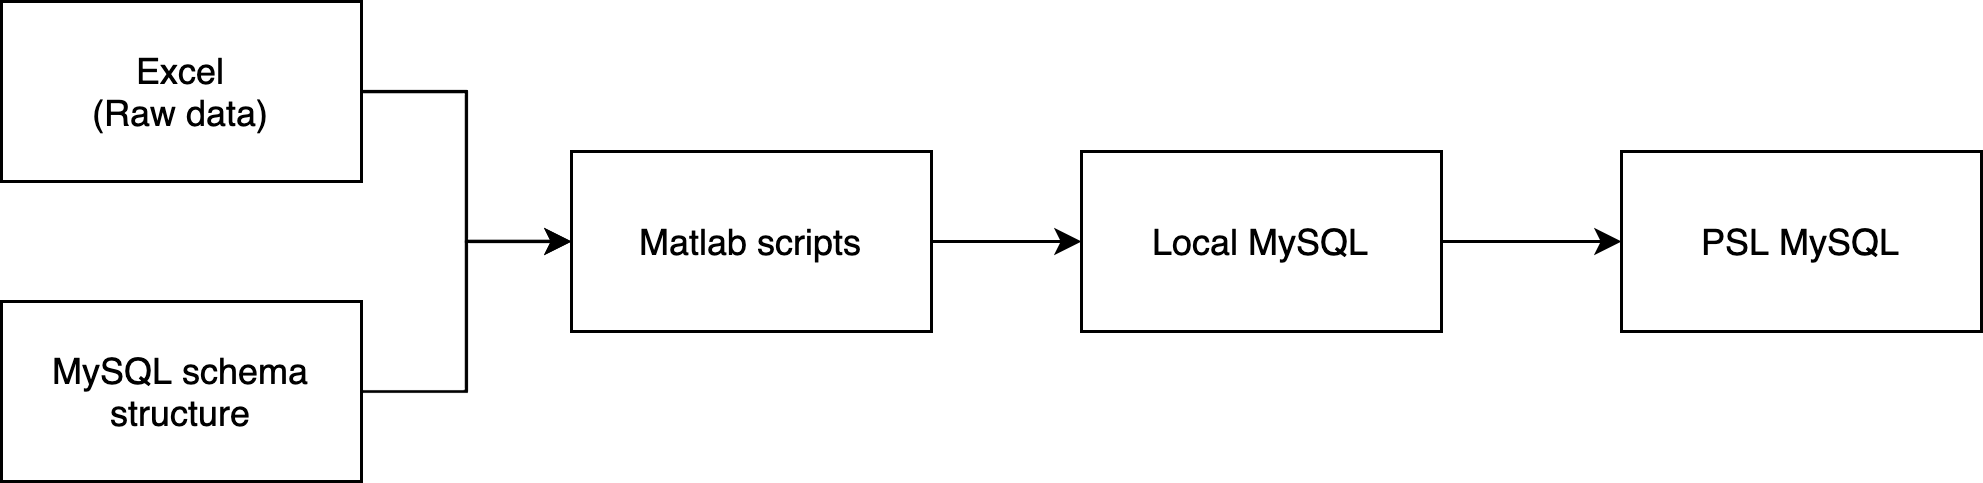
The ending point: The input database of Nexus-e is served by a MySQL server from the Power Systems Laboratory (PSL) at ETH Zurich. This is the PSL MySQL block shown on the right side of the diagram above, i.e., the ending point of the workflow.
The starting point: The left side of the diagram shows the starting point of the workflow. It contains (1) one Excel file of the raw data and (2) a MySQL schema structure (i.e., an empty schema without data but with the strucutre). the Excel is shared through Git and is available in
\scenario_data\source_excel, while the schema structure can be found in the folderShared/DBcreation/schema_structure.What to do: (1) get the Excel file (either find it on Git (as instructed above) or ask the Nexus-e team (nexus-e@ethz.ch) for it) and (2) upload the schema structure to your local MySQL server (instructions on how to work with the local MySQL).
The intermediate steps: The raw data in the Excel is organized and populated into the MySQL schema structure in your local MySQL. This is conducted with the Matlab script
Shared/DBcreation/addNexusExcel2dataBase.... This script calls other Matlab functions. Basically (but not always) each function takes care of one sheet in the Excel or one table in the schema. After running the script and making sure that the schema in your local MySQL is correctly populated, you can move the populated database to the PSL MySQL server.What to do: (1) At the beginning of the
addNexusExcel2dataBase...script (look for the sign###>---<###) edit the inputs as instructed in the script, (2) inRun_Nexuse/conf_localprovide the credentials to your local MySQL inUserDBInfo_local.txt, (3) edit theDB_INFO_FILEandPATH_MYSQLvariables inconf_local.m(instructions), (4) run the scriptaddNexusExcel2dataBase..., (5) when ready, export your local database and import it to the PSL MySQL (instructions on how to import/export a database).
In summary, if you want to modify the data stored in the database:
To change a data that is already in the input database, you only need to change the data in the Excel file and run the Matlab script with the existing schema structure. (You could theoretically also directly change the MySQL database, but to keep the workflow consistent, we recommend to always start from the Excel file.)
To add new data to the input database, you will also need to adjust the schema structure and the Matlab script.